Table of Contents
Module
- 백엔드에서 대부분의 애플리케이션들은 재사용성과 확장성을 위해 코드를 모듈화
- NestJS에서도
@Module()데코레이터를 이용해 코드를 쉽게 모듈화하도록 해줌 - 모듈화된 application graph의 시작점이 되는 root module은 항상 존재해야함
- (application graph: 모듈의 관계와, 프로바이더의 의존성 관계를 파악하기 위해 사용하는 NestJS의 내부 데이터 구조)
@Module() 데코레이터
@Module()데코레이터는ModuleMetadata라는 객체를 인자로 받음ModuleMetadata는 다음과 같은 프로퍼티를 가짐- imports: 이 모듈에서 필요로 하는 프로바이더를 export 하고 있는 모듈들
- controllers: 이 모듈에서 정의하고 있는 컨트롤러들
- providers: Nest Injector에 의해 초기화(instantiate) 되고, 사용될 프로바이더들
- exports: 이 모듈에서 다른 모듈에 제공하는 프로바이더들
? Guard는 @Injectable() 데코레이터가 붙지만 왜 providers에 추가하지 않아도 괜찮은걸까?
Module 공유
- A 모듈에서 B 모듈의
BService프로바이더를 사용하고 싶은 경우
// B.module.ts

@Module({
  controllers: [BController],
  providers: [BService],
  exports: [BService]
})
export class BModule {}


// A.module.ts

@Module({
  controllers: [AController],
  imports: [BModule]
})
export class AModule {}
Global Module
- Global module은, 다른 모듈에서 import 없이도 사용할 수 있음
- 가능한 Global module은 적게 사용하는 것이 좋음
// User 모듈을 글로벌하게 사용하고 싶은 경우


// app.module.ts
@Module({
  imports: [UserModule, ItemModule],
  controllers: [AppController],
  providers: [AppService],
})
export class AppModule {}


// user.module.ts
@Global()
@Module({
    controllers: [UserController],
    providers: [UserService],
    exports: [UserService]
})
export class UserModule {}
// Item 모듈에서 글로벌 모듈인 User 모듈을 사용하는 예시
// Item 모듈에서 import 없이도 UserService 프로바이더를 사용할 수 있다

// item.module.ts
@Module({
    controllers: [ItemController],
    providers: [ItemService]
})
export class ItemModule {}


// item.controller.ts
@Controller('items')
export class ItemController {
    constructor(
        private itemService: ItemService,
        private userService: UserService
    ) {}
    @Get()
    readItem() {
        const user = this.userService.readUser()
        const item = this.itemService.readItem()
        return user + item
    }
}
Controller
- 요청(Request)을 알맞은 컨트롤러의 알맞은 핸들러로 보내고, 응답(Response)을 유저에게 반환하는 역할
@Controller()데코레이터를 사용
Routing
@Controller()의 인자로 관련된 엔드포인트들을 그룹화할 수 있음@Get(),@Post(), ..와 같은 데코레이터의 인자로 각각의 핸들러에 구체적인 엔드포인트를 만들 수 있음
// user.controller.ts


// http://localhost:3000/users/...
@Controller('users')
export class UserController {

  // http://localhost:3000/users/form
  @Get('form')
  readUserForm() {
    return 'this is form'
  }
}
Request Object
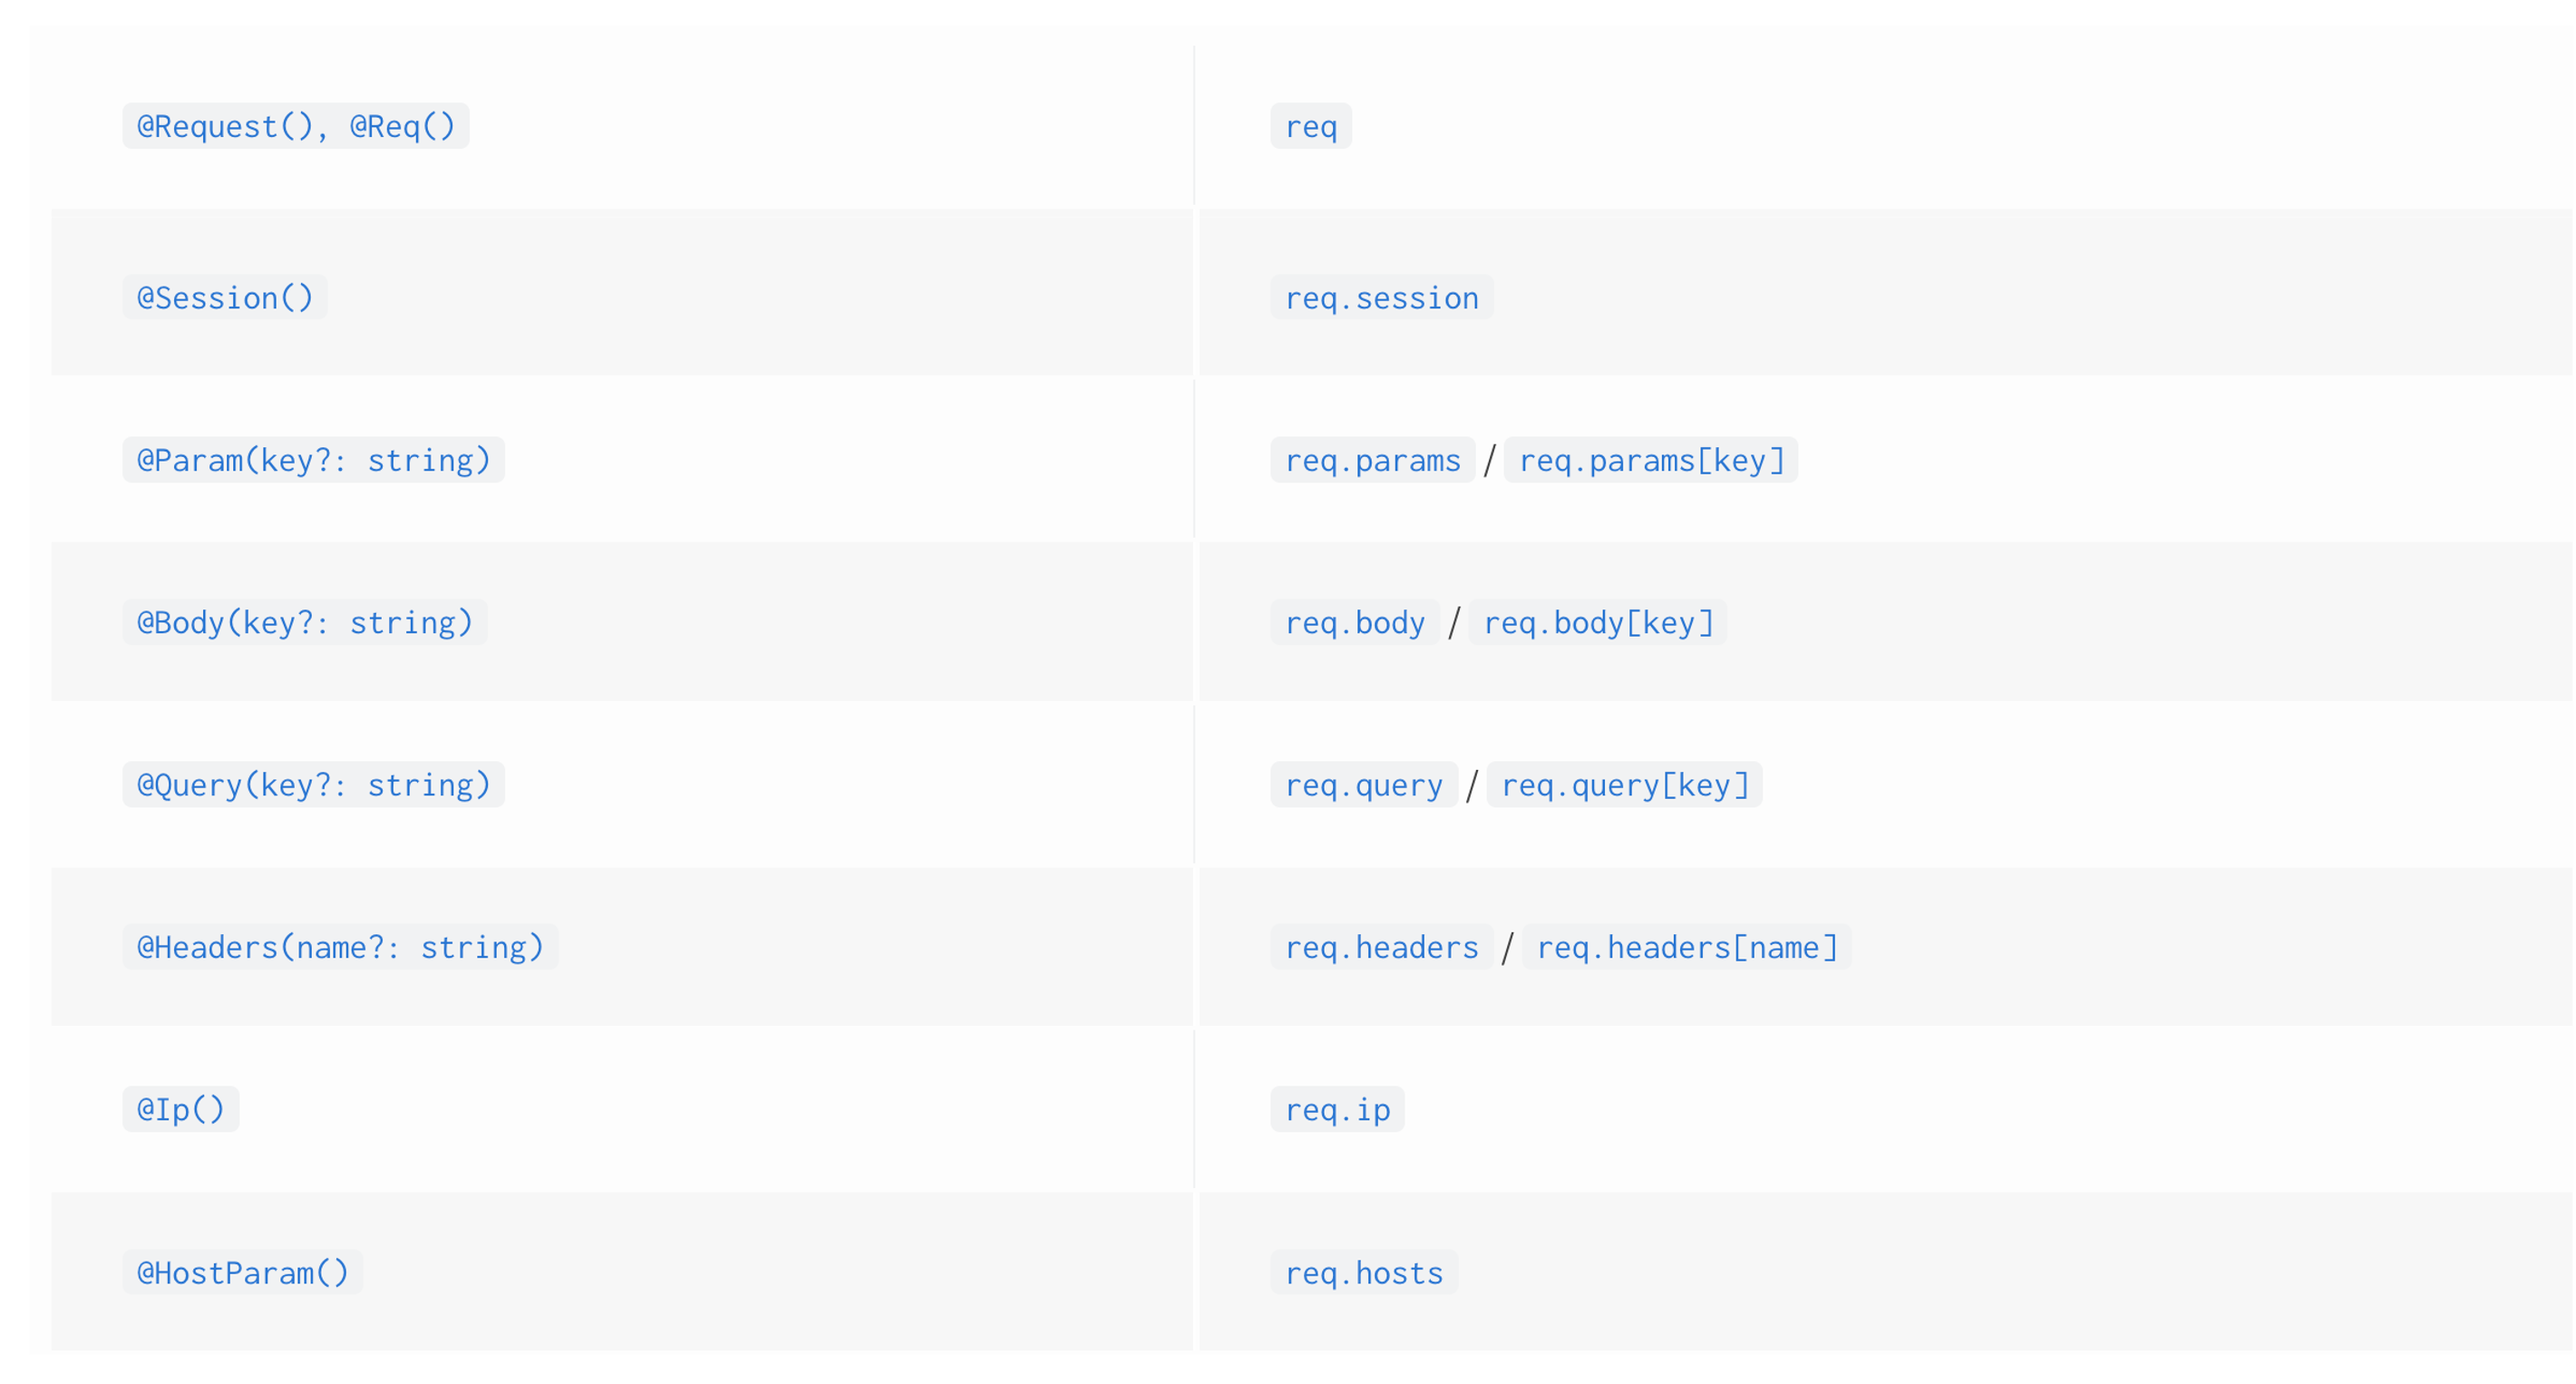
- 핸들러는 종종 유저가 보낸 요청 객체에 접근할 수 있어야함
- 포괄적인 방법으로
@Req()데코레이터로 요청 객체 자체에 접근하는 방법과, - 구체적인 방법으로
@Body(),@Param(),@Query(),@Header(),@Session(),@Ip()등을 사용할 수도 있음 - Express의 이점을 얻기 위해서는, 타입을
Request명시해 주는 것이 좋음 (import { Request } from 'express';)

Path Parameter
- 정적 경로 파라미터와, 동적 경로 파라미터가 있음
- 요청이 들어오면 코드가 위에서 부터 실행되기 때문에, 구체적인 정적 경로 파라미터를 가지는 엔드포인트가 먼저 오도록 해야함
// user.controller.ts

@Controller('users')
export class UserController {

  // 정적 경로 파라미터
  // http://localhost:3000/users/form
  @Get('form')
  readUserForm() {
    return 'this is form'
  }

  // 동적 경로 파라미터
  // http://localhost:3000/users/1
  // http://localhost:3000/users/2
  // ...
  @Get(':id')
  readUser(@Param('id') id: number) {
    return `user id: ${id}`
  }
}
Query Parameter
- key, value 쌍으로 추가 정보를 보낼 수 있음
- 쿼리 파라미터로는 엔드포인트를 분기할 수 없음
- 요청 객체에 쿼리 파라미터에 값을 주지 않으면
undefined가 됨 - 디폴트 값 줄 수 있음 (
@Query('id') id: number = 0) - (Parse 로 시작하는 파이프 (ex.
ParseIntPipe)를 사용할 경우 디폴트 값을 위와 같이 줄 수 없음. 이 때는DefaultValuePipe로 디폴트 줘야함)
// item.controller.ts

@Controller('items')
export class UserController {

  // 아래의 핸들러는 http://localhost/items/1?category=phone URL도 받아들임
  @Get(':id')
  readItem(@Param('id') id: number) {
    return `item id: ${id}`
  }
}
// item.controller.ts

@Controller('items')
export class UserController {

  // 이렇게 두 개의 핸들러를 만들어도
  // http://localhost/items/1?category=phone
  // http://localhost/items/1
  // 이 두 개의 URL 모두 무조건 위에서 먼저 만난 핸들러에서 받아들여짐 -> 쿼리 파라미터는 핸들러 분기의 기준이 안됨

  @Get(':id')
  readItem(@Param('id') id: number) {
    return `item id: ${id}`
  }
  @Get(':id')
  readItem(@Param('id') id: number, @Query('category') category: string) {
    return `item id: ${id}, category: ${category}`
  }
}
@Controller('items')
export class UserController {

  // http://localhost:3000/items?category=television --> { "category": "television" }
  // http://localhost:3000/items --> {}
  @Get()
  readItem(@Query('category') category: string) {
    return { category }
  }

  // http://localhost:3000/items?category=television --> { "category": "television" }
  // http://localhost:3000/items --> { "category": null }
  // 만약 JSON 객체를 리턴할 때, 값이 없더라도 키 값을 할당하고 싶으면 null을 디폴트로,
  // 값이 없으면 키 또한 JSON 객체에 할당하고 싶지 않다면 디폴트를 안주는 것이 낫다
  @Get()
  readItem(@Query('category') category: string = null) {
    return { category }
  }

  // http://localhost:3000/items?id=1 --> { "id": 1 }
  // http://localhost:3000/items --> { "message": "Validation failed", "error": "Bad Request", "statusCode": 400 }
  // Parse * Pipe를 쓸 때는, 디폴트를 다음과 같은 방법으로 줄 수 없다
  @Get()
  readItem(@Query('id', ParseIntPipe) id: number = 0) {
    return { id }
  }
  // http://localhost:3000/items?id=1 --> { "id": 1 }
  // http://localhost:3000/items --> { "id": 0 }
  @Get()
  readItem(@Query('id', new DefaultValuePipe(0), ParseIntPipe) id: number) {
    return { id }
  }
}
Response Object
- 응답 객체를 다루는 두 가지 방식이 있음: Standard(권장되는 방식)와, Library-specific
- Library-specific 방식은 응답 객체에 대한 모든 제어를 직접할 수 있다는 장점이 있음
- 하지만, Library (Express, Fastify)에 따라 코드가 달라짐
- 또한,
@HttpCode(),@Header(), 포스트 인터셉터(Interceptor)가 제대로 동작하지 않게 됨 - (이 부분은
{ passthrough: true }를 인자로 넣어주면 해결됨) - (그래서 쿠키를 설정해야 하는 코드는 위의 옵션을 추가하고 Library-specific 방식을 사용하면서 Standard 방식의 이점도 가져감)
- (Now you can interact with the native response object (for example, set cookies or headers depending on certain conditions), but leave the rest to the framework)
// fully Library-specific 방식
@Get()
readItem(@Res() response: Response) {
  const token = { foo: "bar" }
  response.cookie('token', JSON.stringify(token))
  response.status(HttpStatus.CREATED).send(token)
}

// Library-specific 방식과 Standard 방식 함께 쓰는 방식
@Get()
@HttpCode(201)
readItem(@Res({ passthrough: true }) response: Response) {
  const token = { foo: "bar" }
  response.cookie('token', JSON.stringify(token))
  return true
}
Status Code
- 200번대:
@HttpCode(201) - 300번대:
@Redirect('https://docs.nestjs.com', 302) - 400번대:
throw new NotFoundException() - 또는
@Res()쓰는 경우에는,res.status().send()이렇게 쓰면 됨
Redirect
@Redirect(‘리다이렉트할 URL’, 응답 상태 코드)- 상태코드가 3xx 여야 리다이렉션이 실제로 일어남 (ex. 200으로 하면 리다이렉션 안됨) (디폴트는 302)
- 코드 실행도중 에러나면 리다이렉션 안됨
- 코드 실행도중 예외를 발생시키면 리다이렉션 안됨
return문실행되지만, 실제로 반환은 되지 않고, 리다이렉션됨- 동적으로 리다이렉션 하고 싶은 경우,
HttpRedirectResponse인터페이스를 따르는 객체를 리턴하면 됨 ({ url: 'https://docs.nestjs.com/v5/', statusCode: 301 })
// console.log(1)에 1 찍히지만, users로 리다이렉션 하기 때문에 'read user'가 반환됨
@Get()
@Redirect('http://localhost:3000/users')
readItem() {
  console.log(1)
  return 'read item'
}

// NotFoundException 만나기 때문에 리다이렉션 안됨
@Get()
@Redirect('http://localhost:3000/users')
readItem() {
  throw new NotFoundException()
}


![[NestJS] 구성요소(1) Modules, Controllers](/images/nest_logo.png)

![[NestJS] API 문서화](/images/nestjs_practice_logo.png)