


Table of Contents
결제 서비스에 대한 이해
결제 생태계
- 상점: 온/오프라인으로 물건을 판매하는 곳
- 결제 기관: 신용카드 회사, 은행과 같은 고객의 자금을 관리하는 곳 (ex. 은행)
- PG사: 상점과 다양한 결제 기관 사이에서 결제를 중개하는 곳 (ex. 토스페이먼츠)
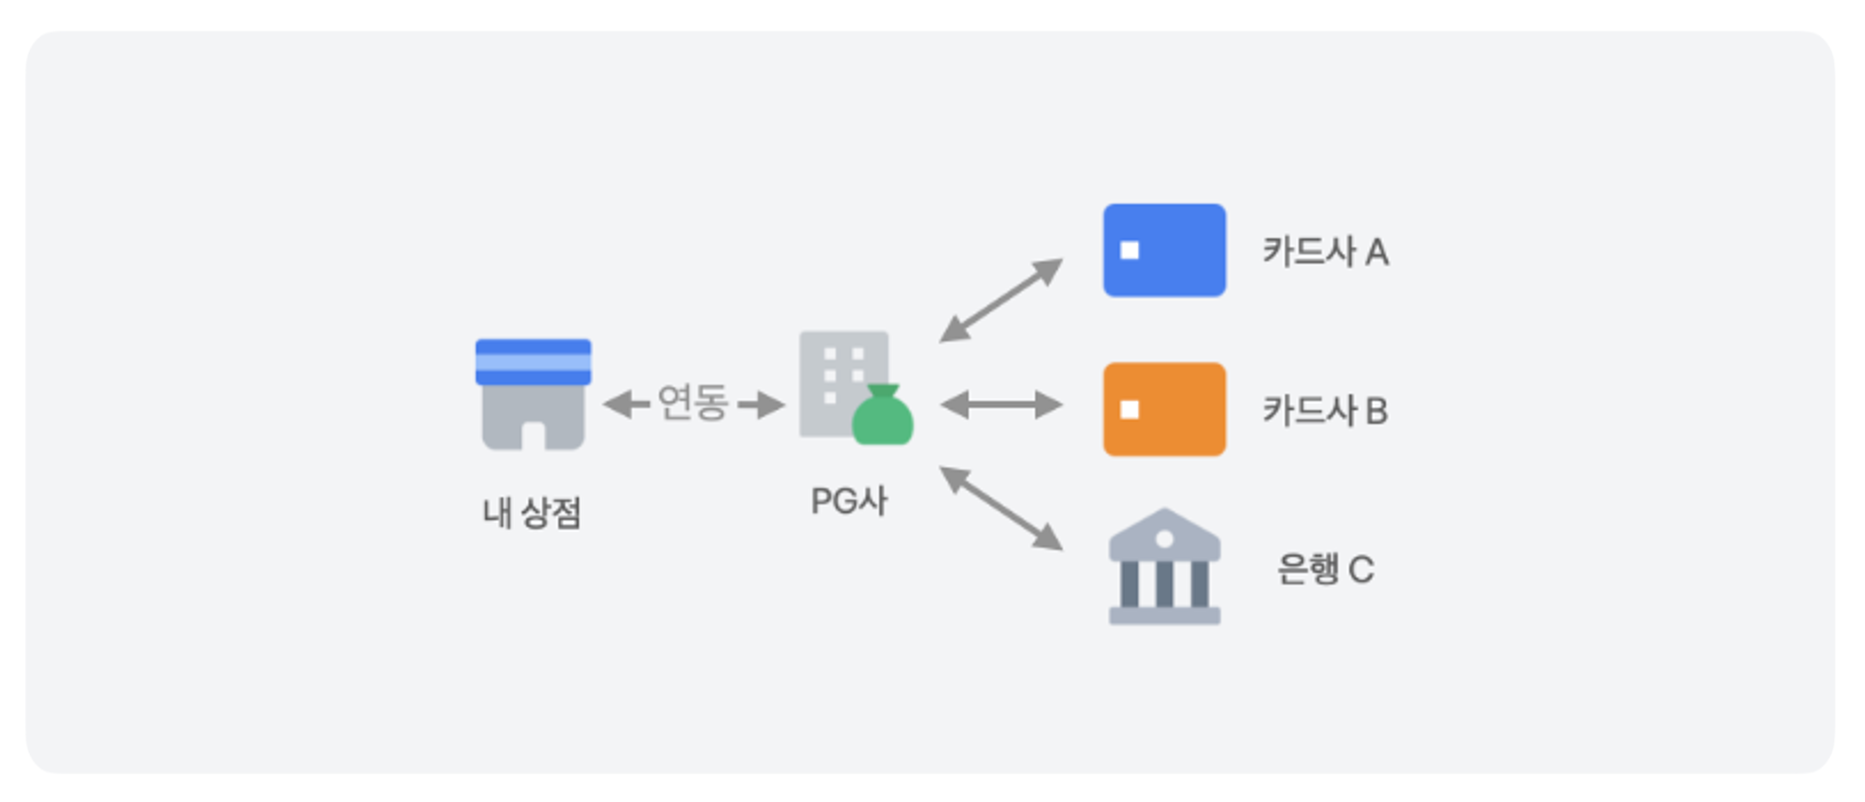
- 구매자가 가지고 있는 결제수단은 다양해요. 상점이 여러 개의 신용카드와 은행 계좌, 간편결제 등 모든 결제수단을 일일이 계약하고 직접 개발하기 어려워요.
- 이런 번거로움을 해결하기 위해 PG사는 여러 결제 기관과 결제 데이터를 안정적으로 주고 받을 수 있는 시스템을 제공해요. PG사 한 곳과 계약하면 여러 카드사, 은행과 계약한 효과를 누릴 수 있죠.
- 이렇게 편리한 결제 서비스를 제공하는 PG사는 편리한 시스템을 제공한 대가로 약간의 수수료를 가져갑니다. 그 외에도 부가세나 기타 비용을 한꺼번에 계산해주죠. 그래서 사업자가 받는 돈은 구매자가 지불한 전체 금액보다 조금 적어요. 이 금액을 정산 금액이라고 해요.
- 상품이나 서비스를 판매한 금액에서 이런 수수료를 PG사가 계산한 뒤 상점에 돈을 주는 과정을 정산이라고 해요.
결제의 흐름

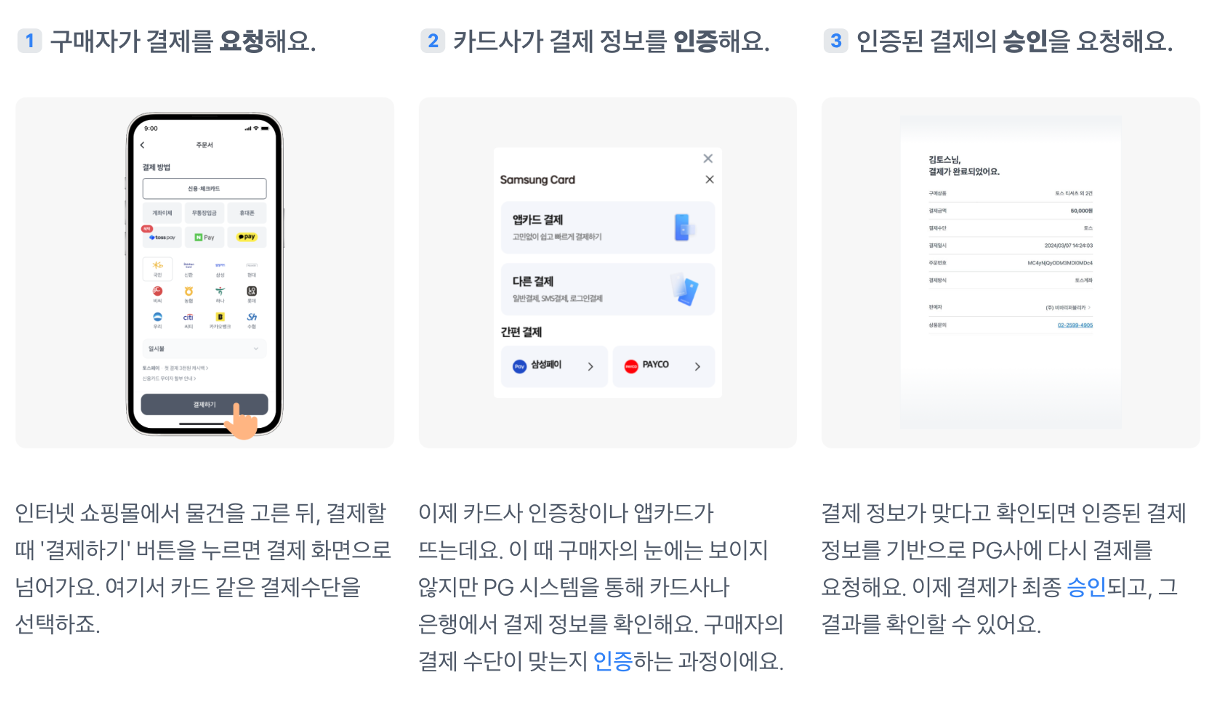
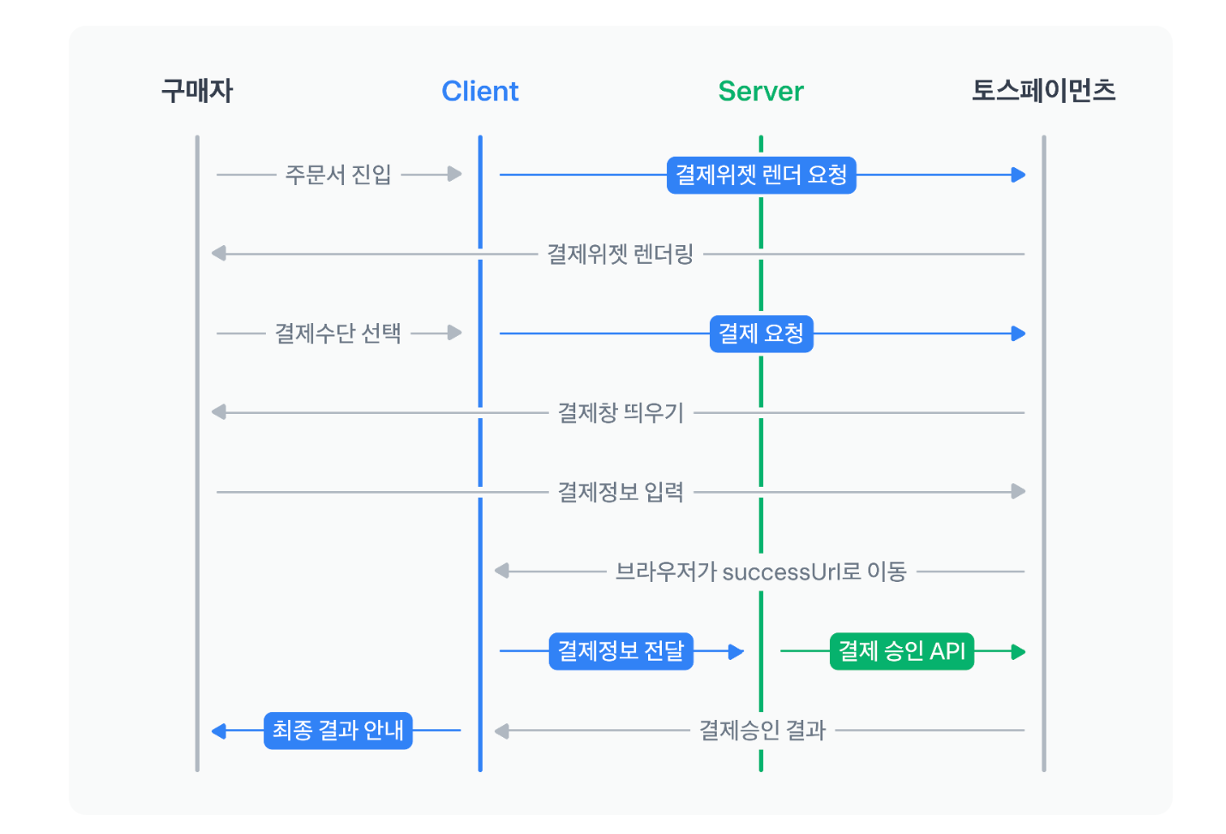
- 고객이 상점에 결제를 요청 하면, 상점은 해당 정보를 PG사에 전달
- PG사는 결제 기관에 전달
- 결제 기관에서 유효한 정보인지 확인하고 인증 결과를 PG사에 알려줌
- 인증 결과가 유효하면 PG사는 결제 정보를 다시 상점에 전달 (인증된 유효한 결제 정보로 다시 요청하도록 유도)
- 비로소 PG사는 해당 결제 정보로 결제 기관에 결제를 요청하고 결제가 이루어짐 (결제 기관이 PG사에 돈을 입금)
- PG사는 금액의 일부를 수수료로 가져가고 나머지 금액을 상점에 입금
- 더 자세한 내용은 여기서 확인
- 테스트 키로 연동할 때 실제 결제 정보(카드 번호, 휴대폰 번호 등)를 사용해도 결제 승인은 가상으로 이루어져요.
- 따라서 테스트 환경에서는 결제 승인에 성공해도 내 결제수단에서 빠져나가는 금액은 없어요.
결제 연동하기
API 키 발급받기
- API 키는 클라이언트를 식별하는 역할을 한다
-
토스페이먼츠는 API 키로 시스템에 접근하는 클라이언트의 인증 정보를 확인하고 올바른 응답을 내려준다
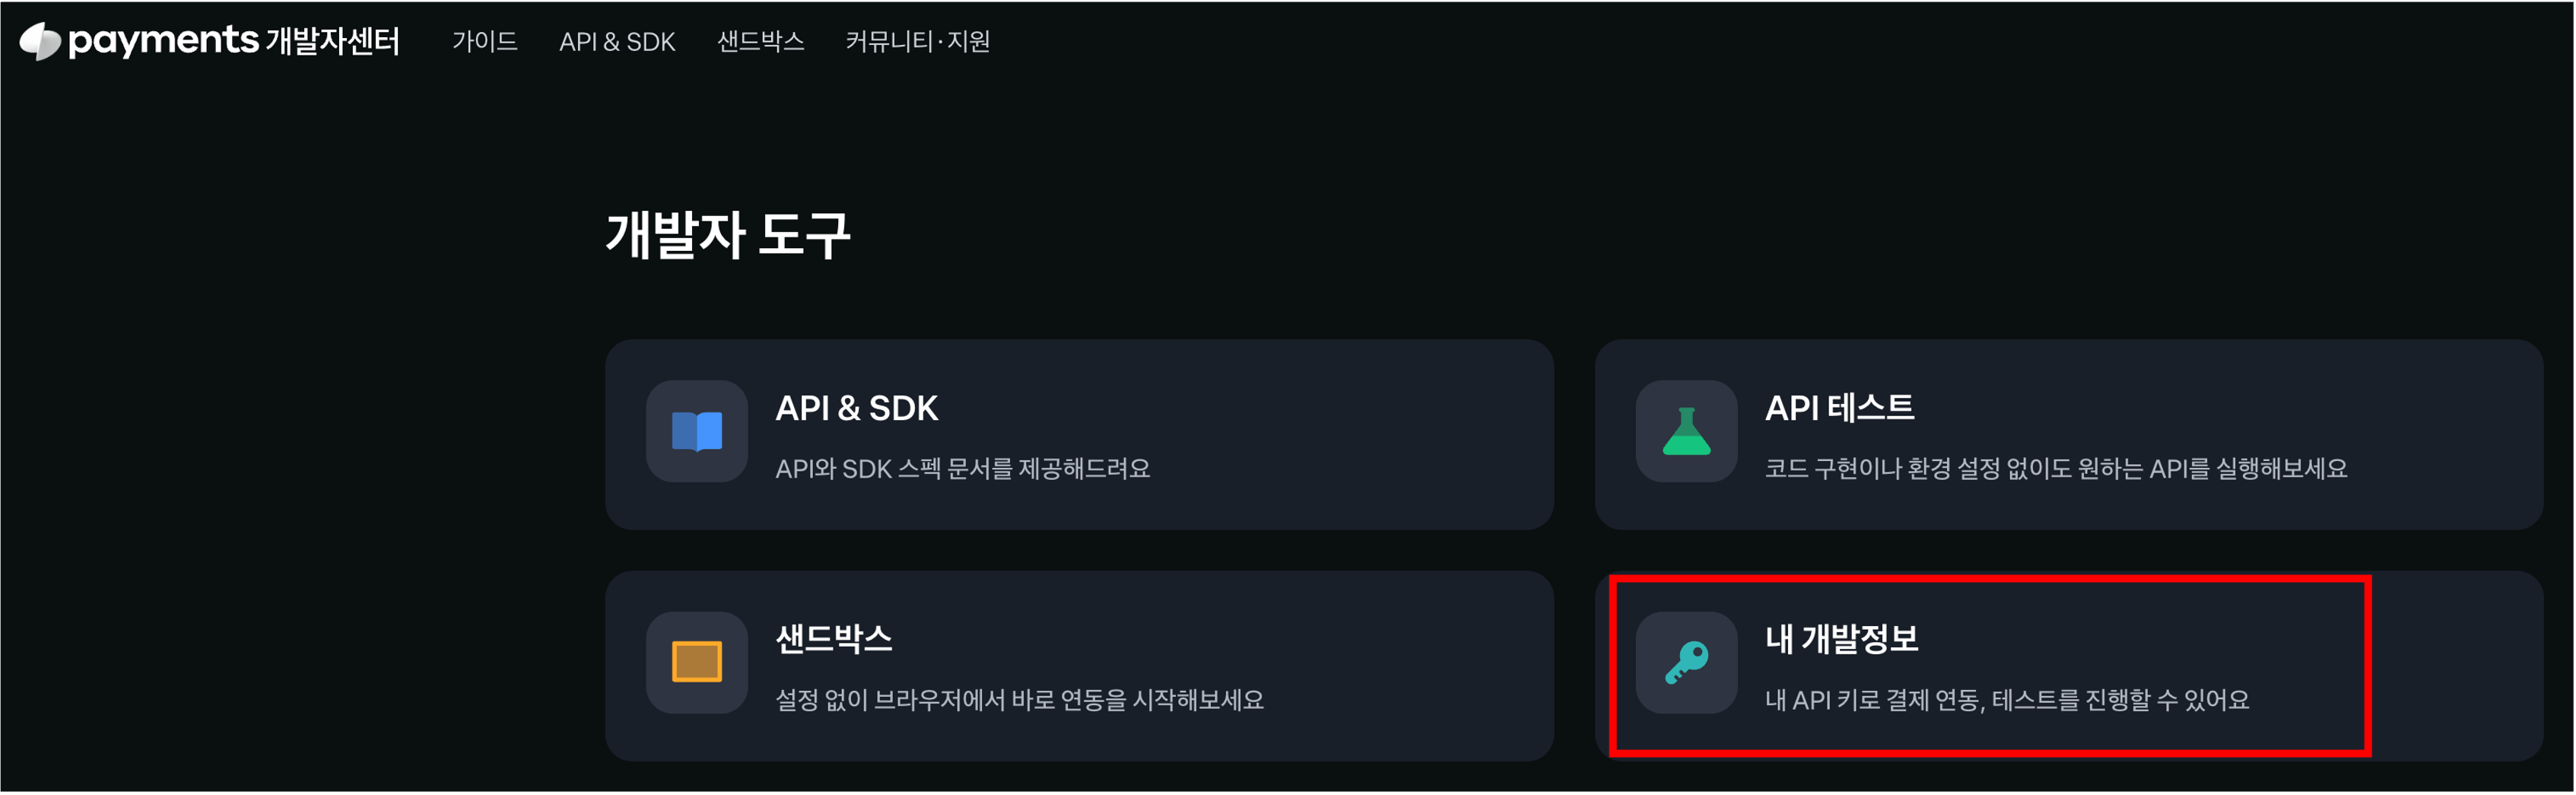
- 토스 개발자 센터로 접속해 내 개발정보를 클릭한다
- 회원가입/로그인하면 다음과 같은 화면 볼 수 있다
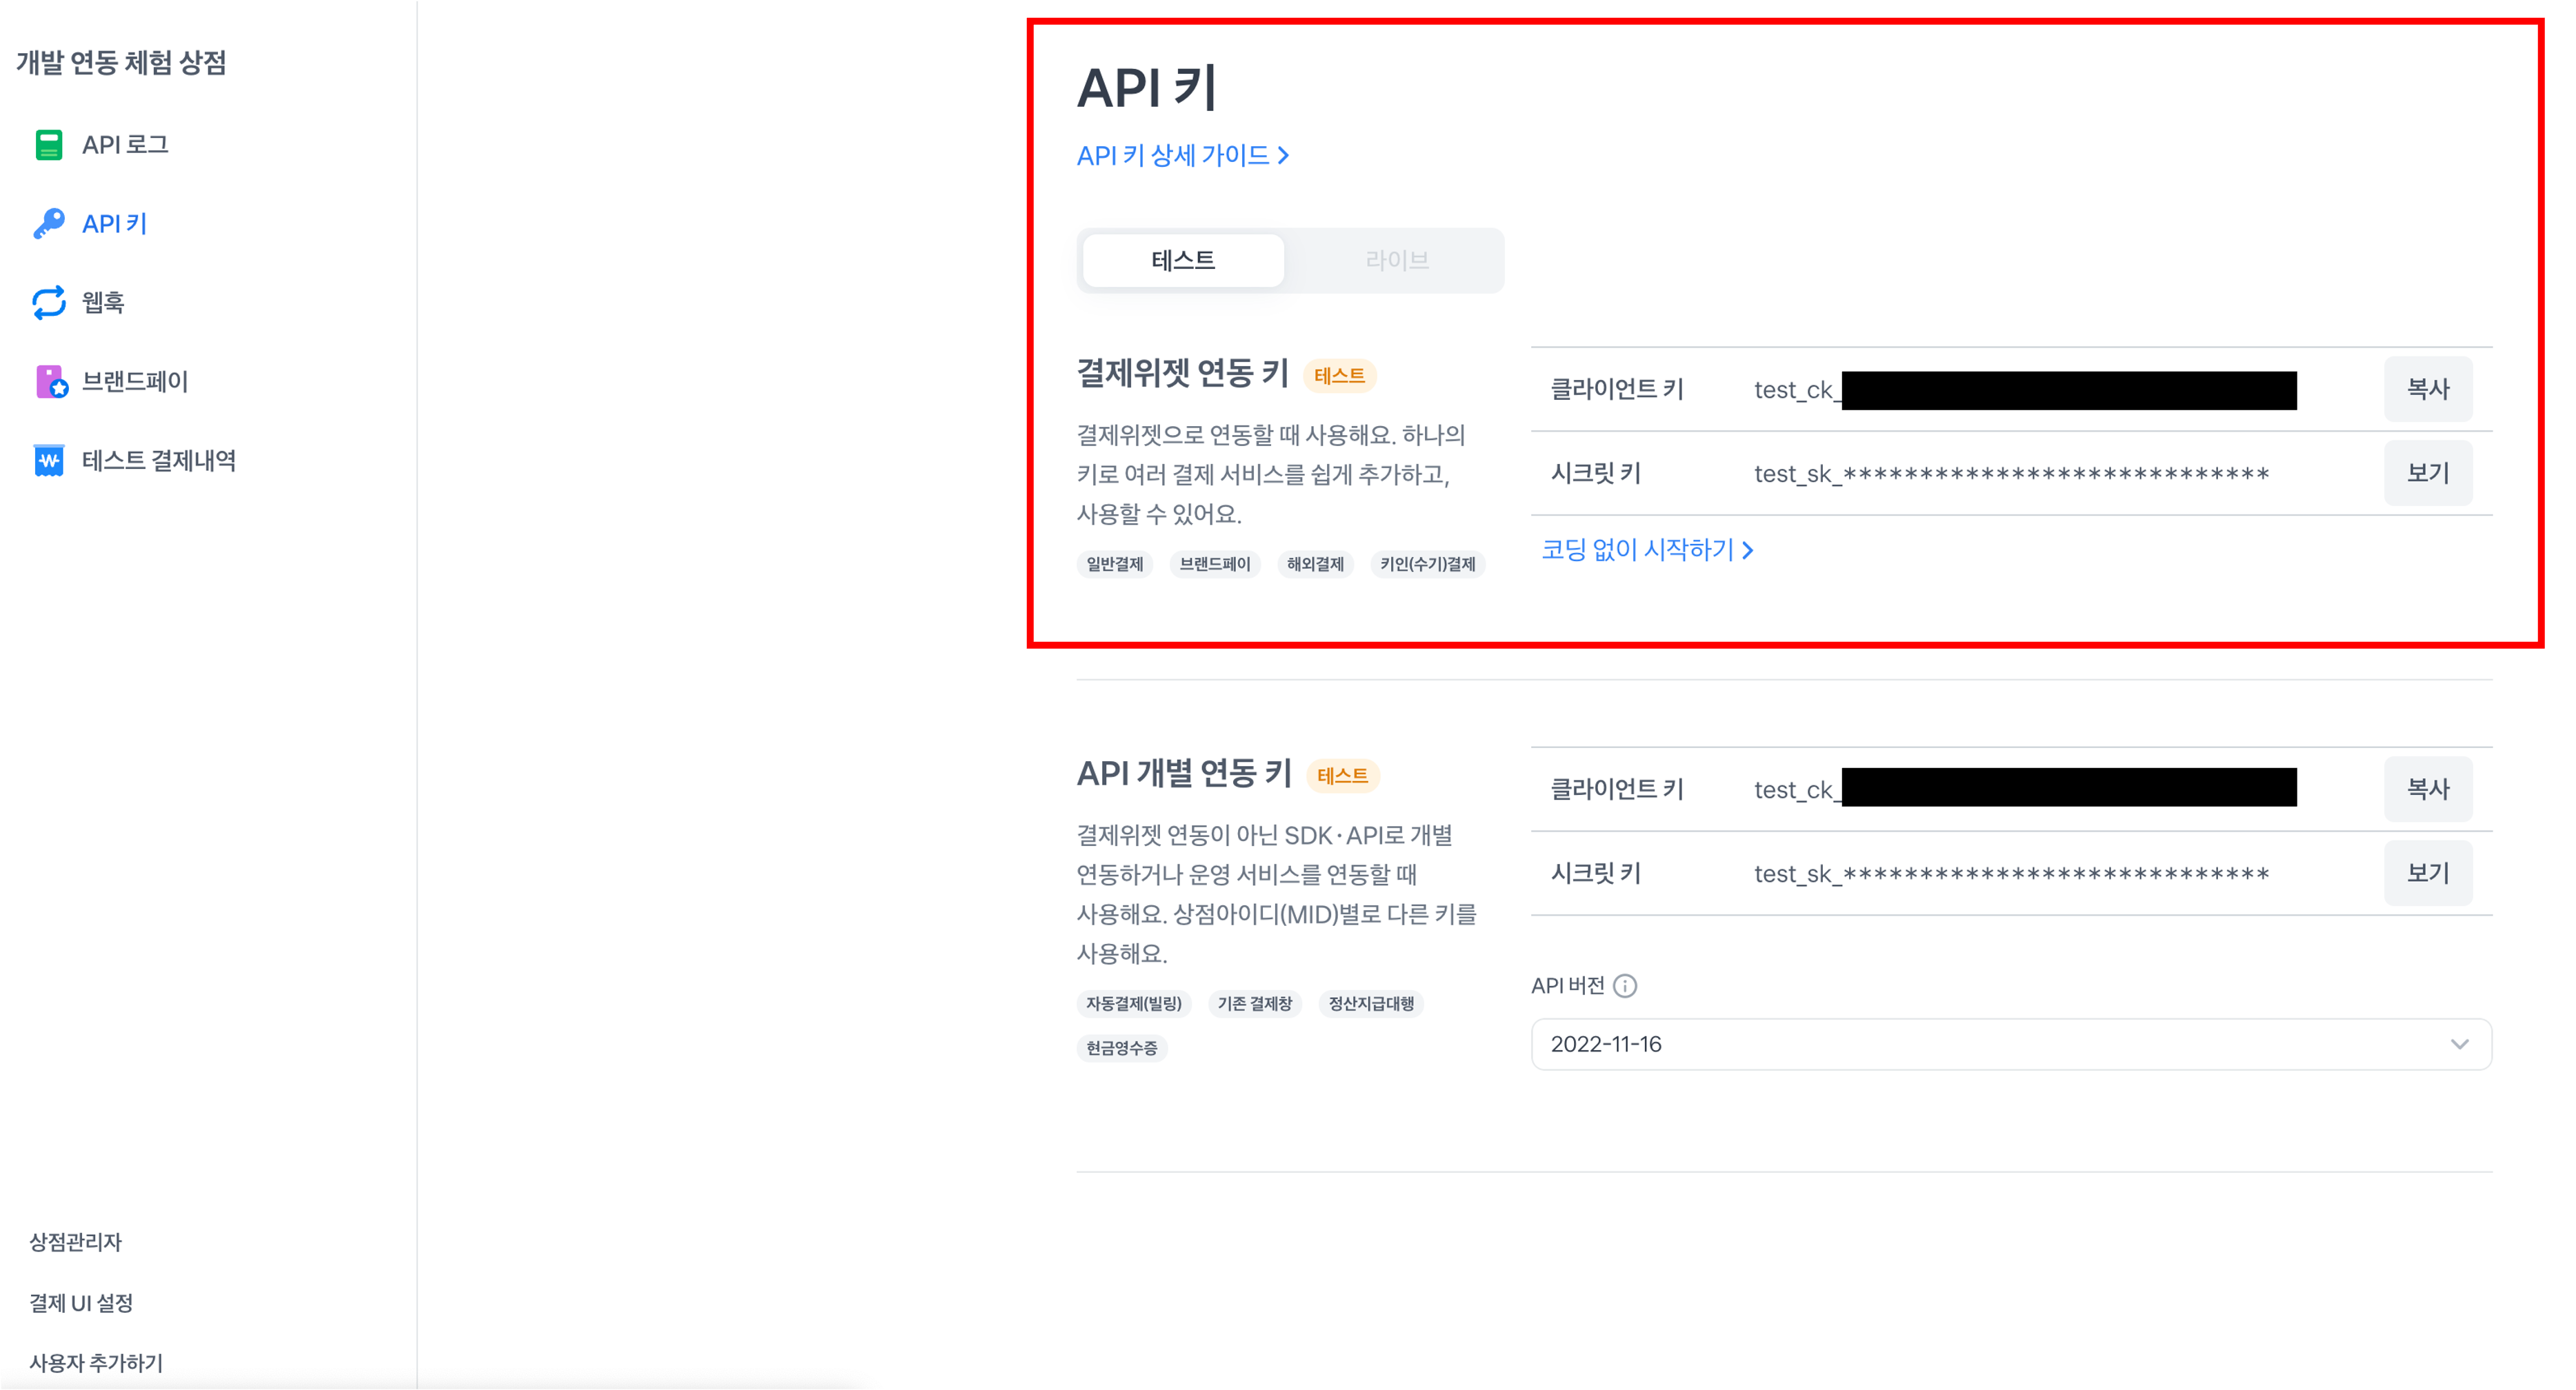
- 클라이언트 키: 결제위젯 SDK를 초기화할 때 필요하다
- 시크릿 키: 결제 승인/취소/조회 같은 코어 API를 사용할 때 필요하다 (노출되면 안된다)
- 결제위젯 연동 키가 안보인다면, 결제위젯 연동 키는 토스페이먼츠 전자결제 신청 이후에만 확인할 수 있어요. 신청 전에는 문서에 있는 테스트 키로 결제위젯을 연동해보세요.
test_gck_docs_Ovk5rk1EwkEbP0W43n07xlzm
test_gsk_docs_OaPz8L5KdmQXkzRz3y47BMw6
결제위젯 SDK 설치
- 스크립트 태그 또는 npm 패키지로 결제위젯 SDK를 설치한다
<script src="https://js.tosspayments.com/v1/payment-widget">
npm install @tosspayments/payment-widget-sdk
코드 작성
- 코드의 흐름을 알고 싶으면 공식문서를 참고하자
- 아래 코드는 Next.js 샘플 코드에서 복사한 코드이다
checkout
import React, { useEffect, useRef, useState } from "react";
import { loadPaymentWidget, ANONYMOUS } from "@tosspayments/payment-widget-sdk";
import { nanoid } from "nanoid";

// 구매자의 고유 아이디를 불러와서 customerKey로 설정하세요.
// 이메일・전화번호와 같이 유추가 가능한 값은 안전하지 않습니다.
const widgetClientKey = "test_gck_docs_Ovk5rk1EwkEbP0W43n07xlzm";
const customerKey = "Ob1ARnMzy_h_ki_JJEy9D";
// const paymentWidget = PaymentWidget(widgetClientKey, PaymentWidget.ANONYMOUS) // 비회원 결제

export function CheckoutPage() {
  const [paymentWidget, setPaymentWidget] = useState(null);
  const paymentMethodsWidgetRef = useRef(null);
  const [price, setPrice] = useState(50_000);

  useEffect(() => {
    const fetchPaymentWidget = async () => {
      try {
        const loadedWidget = await loadPaymentWidget(widgetClientKey, customerKey);
        setPaymentWidget(loadedWidget);
      } catch (error) {
        console.error("Error fetching payment widget:", error);
      }
    };

    fetchPaymentWidget();
  }, []);

  useEffect(() => {
    if (paymentWidget == null) {
      return;
    }

    // renderPaymentMethods() 메서드로 결제 UI를 렌더링하세요
    const paymentMethodsWidget = paymentWidget.renderPaymentMethods(
      "#payment-widget",
      { value: price },
      { variantKey: "DEFAULT" }
    );

    // renderAgreement() 메서드로 이용약관 UI를 렌더링하세요
    paymentWidget.renderAgreement(
      "#agreement",
      { variantKey: "AGREEMENT" }
    );

    paymentMethodsWidgetRef.current = paymentMethodsWidget;
  }, [paymentWidget, price]);

  useEffect(() => {
    const paymentMethodsWidget = paymentMethodsWidgetRef.current;

    if (paymentMethodsWidget == null) {
      return;
    }
    // 결제 금액을 업데이트하려면 updateAmount()를 호출하세요
    paymentMethodsWidget.updateAmount(price);
  }, [price]);

  const handlePaymentRequest = async () => {
    // 결제를 요청하기 전에 orderId, amount를 서버에 저장하세요.
    // 결제 과정에서 악의적으로 결제 금액이 바뀌는 것을 확인하는 용도입니다.
    try {
      // 결제 버튼에 결제 요청 메서드 requestPayment()를 이벤트로 걸어주세요
      await paymentWidget?.requestPayment({
        orderId: nanoid(),
        orderName: "토스 티셔츠 외 2건",
        customerName: "김토스",
        customerEmail: "customer123@gmail.com",
        customerMobilePhone: "01012341234",
        // 클라이언트는 결제 인증이 성공하면 successUrl로 이동하고, 실패하면 failUrl로 이동해요
        successUrl: `${window.location.origin}/success`, // successUrl로 이동할 때 URL에 paymentType, orderId, paymentKey, amount 파라미터 전달됨
        failUrl: `${window.location.origin}/fail`,
      });
    } catch (error) {
      console.error("Error requesting payment:", error);
    }
  };

  return (
    <div>
      {/* 할인 쿠폰 */}
      <label htmlFor="coupon-box">
        <input
          id="coupon-box"
          type="checkbox"
          onChange={(event) => {
            setPrice(event.target.checked ? price - 5_000 : price + 5_000);
          }}
        />
        <span>5,000원 쿠폰 적용</span>
      </label>
      {/* 결제 UI, 이용약관 UI 영역 */}
      <div id="payment-widget" />
      <div id="agreement" />
      {/* 결제하기 버튼 */}
      <button onClick={handlePaymentRequest}>결제하기</button>
    </div>
  );
}
success
import axios from "axios";
import { GetServerSideProps } from "next";
import Link from "next/link";

// ------ Payment 객체 ------
// @docs https://docs.tosspayments.com/reference#payment-객체
interface Payment {
  orderName: string;
  approvedAt: string;
  receipt: {
    url: string;
  };
  totalAmount: number;
  method: "카드" | "가상계좌" | "계좌이체";
  paymentKey: string;
  orderId: string;
}

export const getServerSideProps: GetServerSideProps = async (context) => {
  const {
    query: { paymentKey, orderId, amount },
  } = context;

  try {
    // ------  결제 승인 ------
    // @docs https://docs.tosspayments.com/guides/payment-widget/integration#3-결제-승인하기
    // 쿼리 파라미터의 amount 값과 renderPaymentMethods()의 amount 파라미터의 값이 같은지 반드시 확인하세요. 클라이언트에서 결제 금액을 조작하는 행위를 방지할 수 있습니다. 만약 값이 다르다면 결제를 취소하고 구매자에게 알려주세요
    // 서버로 paymentKey, amount, orderId 값을 전달하세요. 결제 승인에 필요한 데이터입니다. 결제 승인 결과에 따라 클라이언트에서 필요한 결제 성공 및 실패 로직을 추가하세요
    const { data: payment } = await axios.post<Payment>(
      "https://api.tosspayments.com/v1/payments/confirm",
      {
        paymentKey,
        orderId,
        amount,
      },
      {
        headers: {
          Authorization: `Basic ${Buffer.from(`${process.env.TOSS_PAYMENTS_SECRET_KEY}:`).toString("base64")}`,
        },
      }
    );
    console.log(payment);
    return {
      props: { payment },
    };
  } catch (err: any) {
    console.error("err", err.response.data);

    return {
      redirect: {
        destination: `/fail?code=${err.response.data.code}&message=${encodeURIComponent(err.response.data.message)}`,
        permanent: false,
      },
    };
  }
};

interface Props {
  payment: Payment;
}

export default function SuccessPage({ payment }: Props) {
  return (
    <main>
      <div className="box_section">
        <img width="100px" src="https://static.toss.im/illusts/check-blue-spot-ending-frame.png" />
        <h2>결제를 완료했어요</h2>
        <div className="p-grid typography--p">
          <div className="p-grid-col text--left">
            <b>결제금액</b>
          </div>
          <div className="p-grid-col text--right" id="amount">
            {payment.totalAmount.toLocaleString()}원
          </div>
        </div>
        <div className="p-grid typography--p">
          <div className="p-grid-col text--left">
            <b>주문번호</b>
          </div>
          <div className="p-grid-col text--right" id="orderId">
            {payment.orderId}
          </div>
        </div>
        <div className="p-grid typography--p">
          <div className="p-grid-col text--left">
            <b>paymentKey</b>
          </div>
          <div className="p-grid-col text--right" id="paymentKey">
            {payment.paymentKey}
          </div>
        </div>
        <div className="p-grid-col">
          <Link href="https://docs.tosspayments.com/guides/payment-widget/integration">
            <button className="button p-grid-col5">연동 문서</button>
          </Link>
          <Link href="https://discord.gg/A4fRFXQhRu">
            <button className="button p-grid-col5">
              실시간 문의
            </button>
          </Link>
        </div>
      </div>
      <div className="box_section">
        <b>Response Data :</b>
        <div id="response">
          {payment && <pre>{JSON.stringify(payment, null, 4)}</pre>}
        </div>
      </div>
    </main>
  );
}
fail
import { useRouter } from "next/router";
import Link from "next/link";

export default function FailPage() {
  const { query } = useRouter();

  return (
    <main>
      <div id="info" className="box_section">
        <img width="100px" src="https://static.toss.im/lotties/error-spot-no-loop-space-apng.png" alt="에러 이미지" />
        <h2>결제를 실패했어요</h2>

        <div className="p-grid typography--p">
          <div className="p-grid-col text--left">
            <b>에러메시지</b>
          </div>
          <div className="p-grid-col text--right" id="message">
            {query.code ?? "UNKNOWN_ERROR"}
          </div>
        </div>
        <div className="p-grid typography--p">
          <div className="p-grid-col text--left">
            <b>에러코드</b>
          </div>
          <div className="p-grid-col text--right" id="code">
            {query.message ?? "알 수 없음"}
          </div>
        </div>

        <div className="p-grid-col">
          <Link href="https://docs.tosspayments.com/guides/payment-widget/integration">
            <button className="button p-grid-col5">연동 문서</button>
          </Link>
          <Link href="https://discord.gg/A4fRFXQhRu">
            <button className="button p-grid-col5">
              실시간 문의
            </button>
          </Link>
        </div>
      </div>
    </main>
  );
}
server
const express = require("express");
const got = require("got"); // 'got'은 Node.js에서 HTTP 요청을 보내는 데 사용되는 간단하고 강력한 라이브러리

const app = express();

app.use(express.json());
app.use(express.urlencoded({ extended: true }));

app.post("/confirm", function (req, res) {
  // 클라이언트에서 받은 JSON 요청 바디입니다.
  const { paymentKey, orderId, amount } = req.body;

  // 토스페이먼츠 API는 시크릿 키를 사용자 ID로 사용하고, 비밀번호는 사용하지 않습니다.
  // 비밀번호가 없다는 것을 알리기 위해 시크릿 키 뒤에 콜론을 추가합니다.
  // 시크릿 키와 :을 base64로 인코딩해서 Basic 인증 헤더를 아래와 같이 만들어주세요. :을 빠트리지 않도록 주의하세요. 비밀번호가 없다는 것을 알리기 위해 시크릿 키 뒤에 콜론을 추가합니다.
  const widgetSecretKey = "test_sk_PBal2vxj81jX4Bba4ovy35RQgOAN";
  const encryptedSecretKey =
    "Basic " + Buffer.from(widgetSecretKey + ":").toString("base64");

  // 결제를 승인하면 결제수단에서 금액이 차감돼요. 토스페이먼츠 결제 승인 API를 호출해서 결제를 완료하세요
  got
    .post("https://api.tosspayments.com/v1/payments/confirm", {
      headers: {
        Authorization: encryptedSecretKey,
        "Content-Type": "application/json",
      },
      json: {
        orderId: orderId,
        amount: amount,
        paymentKey: paymentKey,
      },
      responseType: "json",
    })
    .then(function (response) {
      // 결제 성공 비즈니스 로직을 구현하세요.
      // 결제 승인에 성공하면 HTTP 200 OK와 Payment 객체를 받습니다.
      // paymentKey, orderId는 서버에 필수로 저장하세요. 결제 조회, 결제 취소에 사용되는 값입니다. 나머지 값들은 필요에 따라 저장하세요.
      console.log(response.body);
      res.status(response.statusCode).json(response.body)
    })
    .catch(function (error) {
      // 결제 실패 비즈니스 로직을 구현하세요.
      console.log(error.response.body);
      res.status(error.response.statusCode).json(error.response.body)
    });
});

app.listen(4242, () =>
  console.log(`http://localhost:${4242} 으로 샘플 앱이 실행되었습니다.`)
);