Table of Contents
- 카프카의 데이터 저장 방식
- 저장된 데이터의 포맷(Kafka messages are just bytes)
- 성능 향상을 위한 파티션 수
- 장애 복구를 위한 복제
- 로그 설정을 통해 효율적으로 보관하기(Log Retention)
- 참고
카프카의 데이터 저장 방식
Kafka is typically referred to as a Distributed, Replicated Messaging Queue, which although technically true, usually leads to some confusion depending on your definition of a messaging queue. Instead, I prefer to call it a Distributed, Replicated Commit Log. This, I think, clearly represents what Kafka does, as all of us understand how logs are written to disk. And in this case, it is the messages pushed into Kafka that are stored to disk.
- Kafka는 커밋 로그를 분산 복제하는 시스템
- 여기서 로그는 우리가 디스크에 저장한 메세지를 의미
- (우리의 메세지를 로그로 표현하려고 하는 이유는 아마 메세지 안에 보통 데이터 뿐만 아니라 다른 메타데이터도 들어 있어서?)
카프카의 데이터는 다음과 같은 구조로 이루어져 있다.
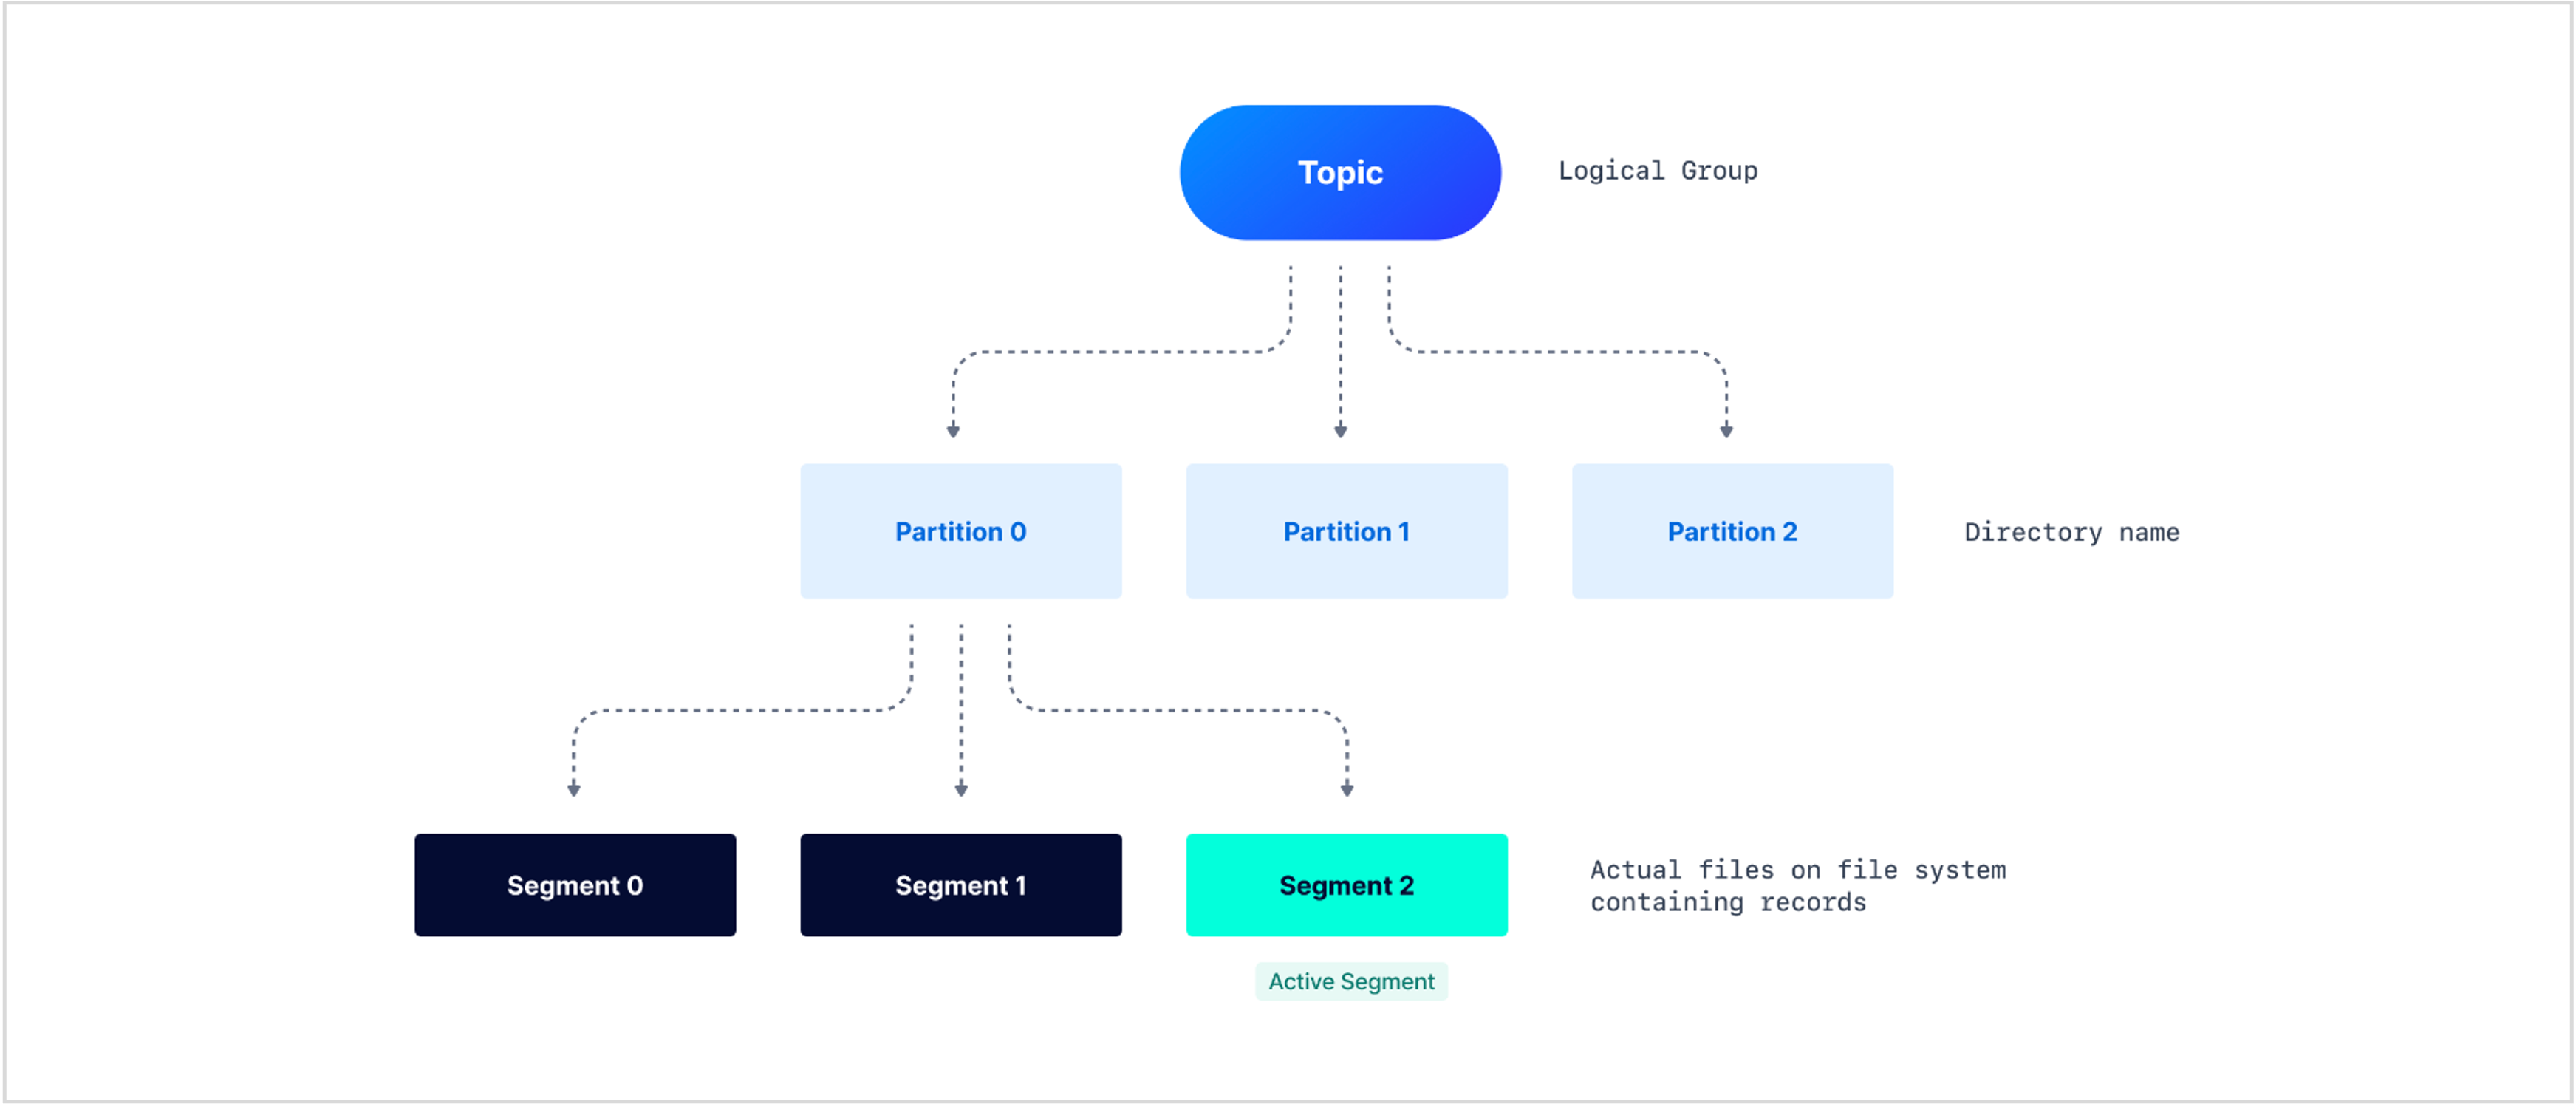
- Topic: namespace처럼 논리적으로 구분하는 기준. 데이터를 구분하는 가장 큰 구분 기준
- Partition: 실제로 컨슈머가 담당하는 작업 단위(컨슈머 그룹내에서 파티션은 하나의 컨슈머에게만 할당 가능). 폴더로 구분
- Segment: 여러 메세지를 묶어놓은 하나의 파일. 파티션 한 개에 여러 개의 세그먼트가 저장되어 있음.
- Message: 우리가 실제로 보내는 데이터 + 생성된 타임스탬프 + 프로듀서 ID + …로 이루어져 있음
Partition
3개의 파티션을 가지는 토픽을 우선 한 개 만들어보자.
kafka-topics.sh --create --topic freblogg --partitions 3 --replication-factor 1 --zookeeper localhost:2181
파티션이 저장되는 위치로 이동해 토픽 이름으로 시작하는 파티션을 검색해보면 3개의 폴더가 보인다.
$ tree freblogg*
freblogg-0
|-- 00000000000000000000.index
|-- 00000000000000000000.log
|-- 00000000000000000000.timeindex
`-- leader-epoch-checkpoint
freblogg-1
|-- 00000000000000000000.index
|-- 00000000000000000000.log
|-- 00000000000000000000.timeindex
`-- leader-epoch-checkpoint
freblogg-2
|-- 00000000000000000000.index
|-- 00000000000000000000.log
|-- 00000000000000000000.timeindex
`-- leader-epoch-checkpoint
다음과 같은 명령어를 실행해 브로커로 메세지를 보내보자.
kafka-console-producer.sh --topic freblogg --broker-list localhost:9092
$ ls -lh freblogg*
freblogg-0:
total 20M
- freblogg 197121 10M Aug  5 08:26 00000000000000000000.index
- freblogg 197121   0 Aug  5 08:26 00000000000000000000.log
- freblogg 197121 10M Aug  5 08:26 00000000000000000000.timeindex
- freblogg 197121   0 Aug  5 08:26 leader-epoch-checkpoint

freblogg-1:
total 21M
- freblogg 197121 10M Aug  5 08:26 00000000000000000000.index
- freblogg 197121  68 Aug  5 10:15 00000000000000000000.log
- freblogg 197121 10M Aug  5 08:26 00000000000000000000.timeindex
- freblogg 197121  11 Aug  5 10:15 leader-epoch-checkpoint

freblogg-2:
total 21M
- freblogg 197121 10M Aug  5 08:26 00000000000000000000.index
- freblogg 197121  79 Aug  5 09:59 00000000000000000000.log
- freblogg 197121 10M Aug  5 08:26 00000000000000000000.timeindex
- freblogg 197121  11 Aug  5 09:59 leader-epoch-checkpoint
두 개의 메세지를 보냈다. 결과를 확인해보면 두 개의 파티션이 가지는 00000000000000000000.log 라는 세그먼트 파일의 용량이 증가했다. 파일을 열어보면 다음과 같은 내용이 적혀있다.
$ cat freblogg-2/*.log
@^@^B°£æÃ^@^K^Xÿÿÿÿÿÿ^@^@^@^A"^@^@^A^VHello World^@
브로커에 저장된 메세지는 바이트 형태로 저장되기 때문에 제대로 디코딩하지 않으면 이상하게 읽힌다. 하지만 Hello World라고 적힌 것을 보아 .log라는 파일에 우리가 보낸 메세지가 저장된다는 것을 알 수 있다.
메세지가 파티션에 하나씩 저장된 이유는 라운드 로빈 방식으로 메세지를 파티션에 할당하기 때문이다. 메세지 할당 방식은 카프카에서 제공하는 다른 방식을 사용할 수도 있고, 만약 메세지에 키를 설정해줬다면 키마다 파티션을 다르게 할당하도록 커스터마이징할 수도 있다.
세그먼트는 여러 메세지를 하나로 묶어 저장하고 있고, 각각의 메세지는 1씩 증가하는 offset을 가진다. 각 세그먼트는 자신이 가지고 있는 메세지의 가장 처음 오프셋을 이름으로 한다.

위와 같은 랜덤한 문자열들을 읽고 싶으면 Kafka 툴을 사용할 수 있다.
kafka-run-class.bat kafka.tools.DumpLogSegments --deep-iteration --print-data-log --files logs/freblogg-2/00000000000000000000.log
This gives the output
Dumping logs/freblogg-2/00000000000000000000.log
Starting offset: 0

offset: 0 position: 0 CreateTime: 1533443377944 isvalid: true keysize: -1 valuesize: 11 producerId: -1 headerKeys: [] payload: Hello World

offset: 1 position: 79 CreateTime: 1533462689974 isvalid: true keysize: -1 valuesize: 6 producerId: -1 headerKeys: [] payload: amazon
CreateTime과 같은 값은 컨슈머로 가져와서 사용할 수 있는 값이 아니다. 카프카 내부적으로 가지고 있는 메타데이터이다. 그렇기 때문에 데이터의 타임스탬프가 필요하다면, 데이터를 생성할 때 내부적으로 메세지에 명시적으로 담아서 브로커에 담아야 한다.
You can see that it stores information of the offset, time of creation, key and value sizes etc along with the actual message payload in the log file.
Segment
위에서 봤던 .log, .index, .timeindex을 모두 세그먼트 파일이라고 한다. 세그먼트 파일을 하나로 하지 않고, 나누어 저장하는 이유는 여러가지가 있다.
그중에서도 데이터를 삭제할 때 이점이 있다는 것이다. Kafka는 구조적 특성으로 메세지마다 데이터를 삭제하는 것이 불가능하다. 유일하게 메세지를 삭제하는 방법은 바로 세그먼트 파일을 삭제하는 것이다. 보통 세그먼트 파일 삭제는 카프카 configuration을 통해 삭제하는 Retention policy 방법을 사용한다. (정책을 통해 주기적으로 삭제)
세그먼트 파일의 의미는 다음과 같다.
.indexfile: This contains the mapping of message offset to its physical position in .log file..logfile: This file contains the actual records and maintains the records up to a specific offset. The name of the file depicts the starting offset added to this file.- .index file: This file has an index that maps a record offset to the byte offset of the record within the** .log **file. This mapping is used to read the record from any specific offset.
.timeindexfile: This file contains the mapping of the timestamp to record offset, which internally maps to the byte offset of the record using the .index file. This helps in accessing the records from the specific timestamp..snapshotfile: contains a snapshot of the producer state regarding sequence IDs used to avoid duplicate records. It is used when, after a new leader is elected, the preferred one comes back and needs such a state to become a leader again. This is only available for the active segment (log file).leader-epoch-checkpoint: It refers to the number of leaders previously assigned by the controller. The replicas use the leader epoch as a means of verifying the current leader. The leader-epoch-checkpoint file contains two columns: epochs and offsets. Each row is a checkpoint for the latest recorded leader epoch and the leader’s latest offset upon becoming leader
An index file for the log file I’ve showed in the ‘Quick detour’ above would look something like this:

If you need to read the message at offset 1, you first search for it in the index file and figure out that the message is in position 79. Then you directly go to position 79 in the log file and start reading. This makes it quite effective as you can use binary search to quickly get to the correct offset in the already sorted index file.

저장된 데이터의 포맷(Kafka messages are just bytes)
Kafka messages are just bytes. Kafka messages are organized into topics. Each message is a key/value, but that is all that Kafka requires. Both key and value are just bytes when they are stored in Kafka. This makes Kafka applicable to a wide range of use cases, but it also means that developers have the responsibility of deciding how to serialize the data.
There are various serialization formats with common ones including:
- JSON
- Avro
- Protobuf
- String delimited (e.g., CSV
There are advantages and disadvantages to each of these—well, except delimited, in which case it’s only disadvantages 😉
Choosing a serialization format
- Schema: A lot of the time your data will have a schema to it. You may not like the fact, but it’s your responsibility as a developer to preserve and propagate this schema. The schema provides the contract between your services. Some message formats (such as Avro and Protobuf) have strong schema support, whilst others have lesser support (JSON) or none at all (delimited string).
- Ecosystem compatibility: Avro, Protobuf, and JSON are first-class citizens in the Confluent Platform, with native support from the Confluent Schema Registry, Kafka Connect, ksqlDB, and more.
- Message size: Whilst JSON is plain text and relies on any compression configured in Kafka itself, Avro and Protobuf are both binary formats and thus provide smaller message sizes.
- Language support: For example, support for Avro is strong in the Java space, whilst if you’re using Go, chances are you’ll be expecting to use Protobuf.
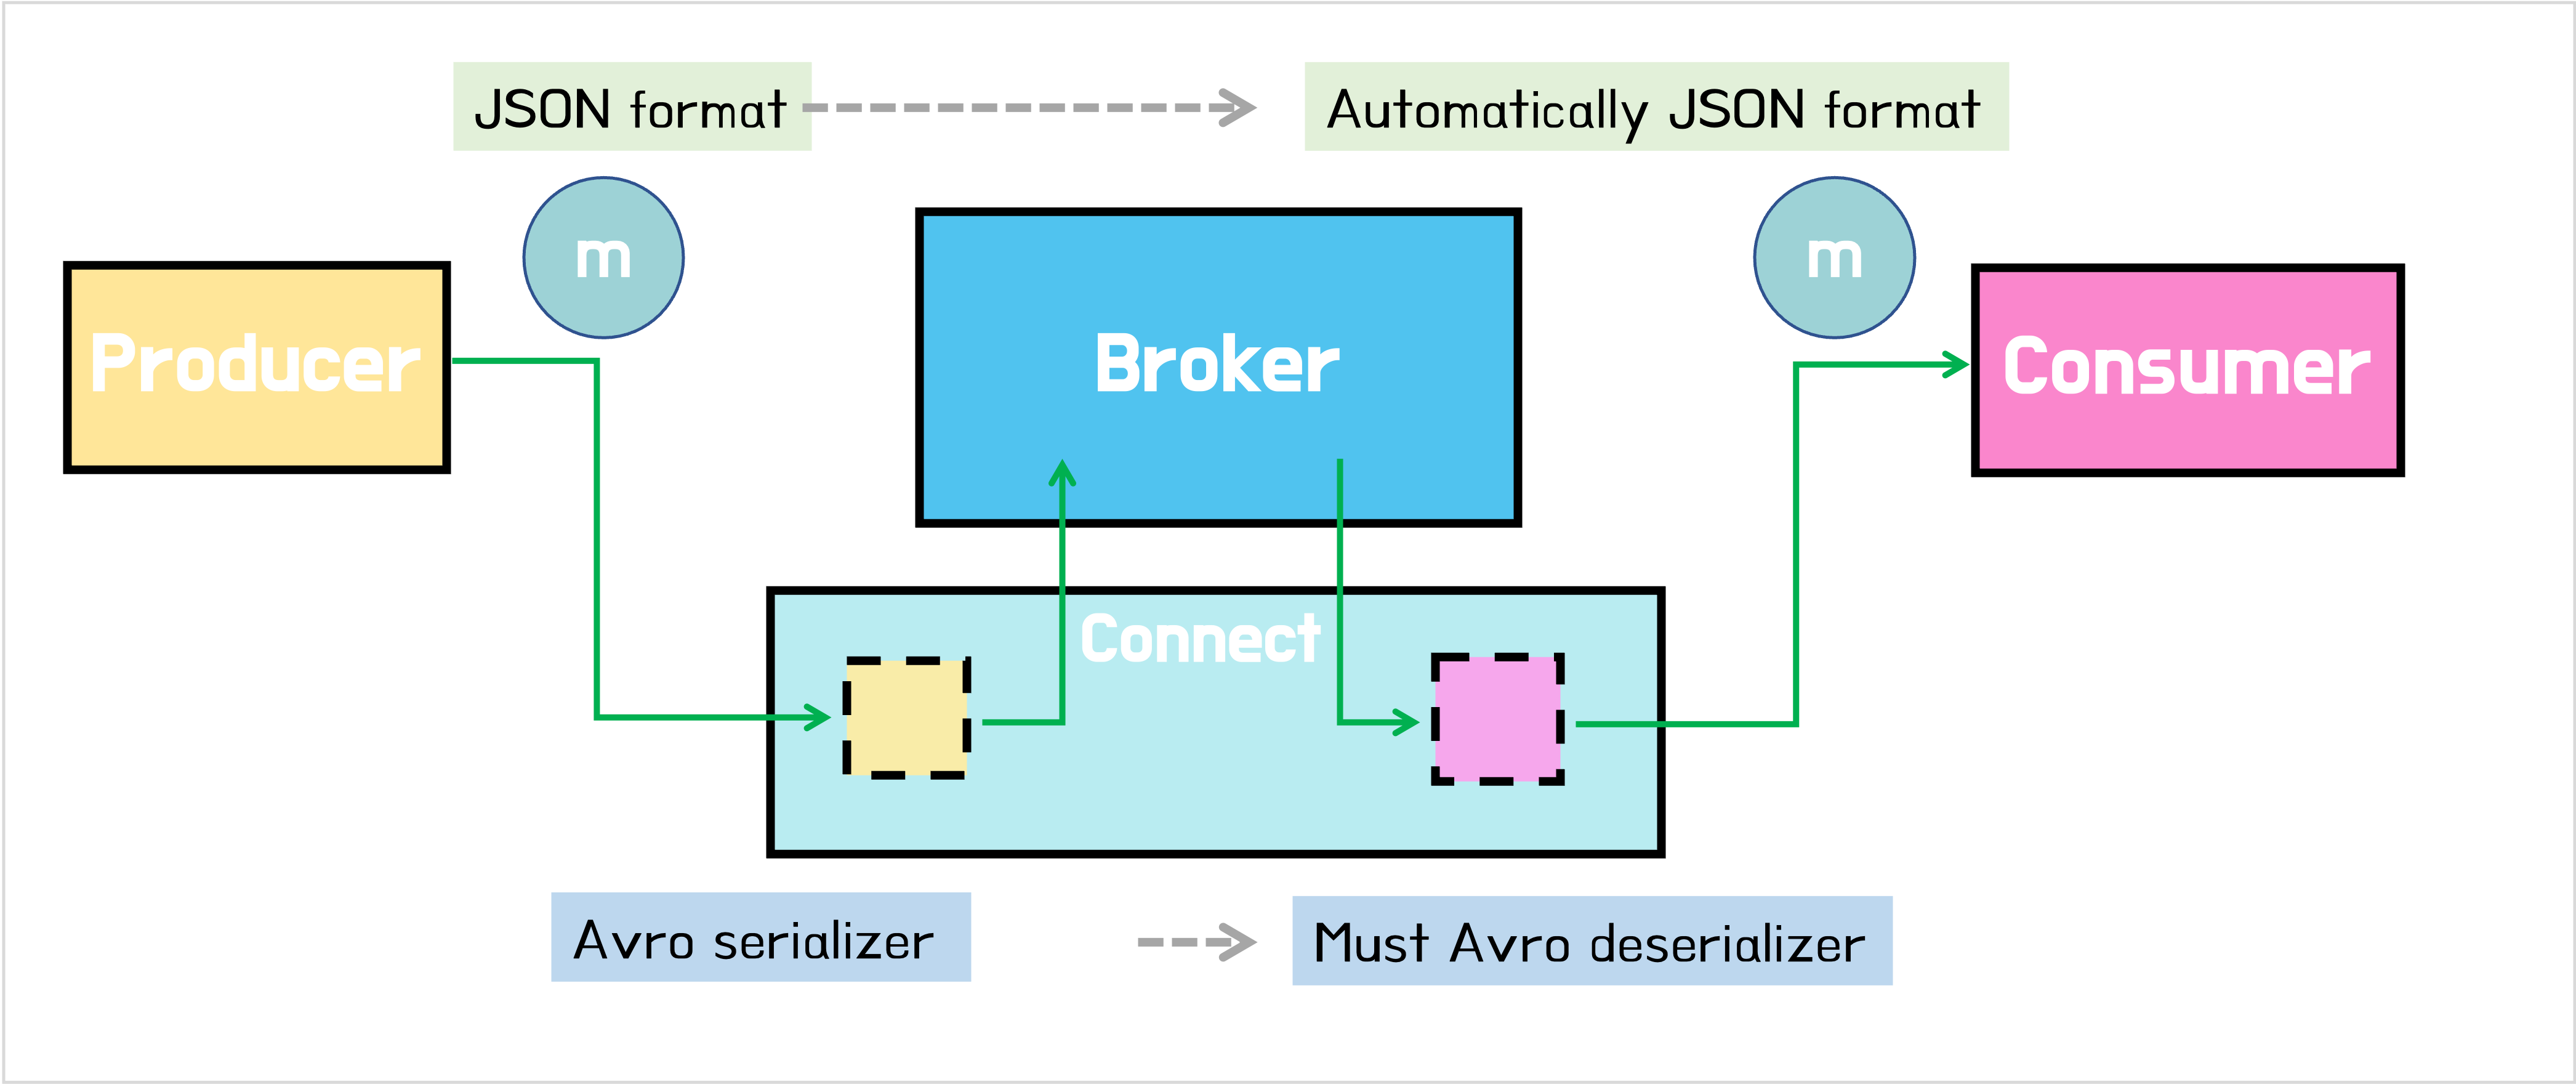
데이터를 브로커에 저장할 때는 전송된 데이터의 포맷과는 상관없이 원하는 포맷으로 브로커에 저장할 수 있다. 예를 들어 프로듀서가 JSON으로 보냈다고 하더라도 브로커에 저장할 때 포맷은 Avro, Parquet, String 뭘 하든 상관없다. 다만 중요한 것은 Serializer로 Avro를 선택했다면, Deserializer도 반드시 Avro를 선택해야 한다. 그러고 나면 컨슈머에서 전달 받는 데이터의 포맷은 자연스럽게 다시 JSON 형태를 얻게 된다.
Remember, Kafka messages are just pairs of key/value bytes, and you need to specify the converter for both keys and value, using the key.converter and value.converter configuration setting. In some situations, you may use different converters for the key and the value.
Here’s an example of using the String converter. Since it’s just a string, there’s no schema to the data, and thus it’s not so useful to use for the value:
"key.converter": "org.apache.kafka.connect.storage.StringConverter",
Some converters have additional configuration. For Avro, you need to specify the Schema Registry. For JSON, you need to specify if you want Kafka Connect to embed the schema in the JSON itself. When you specify converter-specific configurations, always use the key.converter. or value.converter. prefix. For example, to use Avro for the message payload, you’d specify the following:
"value.converter": "io.confluent.connect.avro.AvroConverter",
"value.converter.schema.registry.url": "http://schema-registry:8081",
Common converters include:
# Avro
io.confluent.connect.avro.AvroConverter

# Protobuf
io.confluent.connect.protobuf.ProtobufConverter

# String
org.apache.kafka.connect.storage.StringConverter

# JSON
org.apache.kafka.connect.json.JsonConverter

# JSON schema
io.confluent.connect.json.JsonSchemaConverter

# ByteArray
org.apache.kafka.connect.converters.ByteArrayConverter
JSON의 경우 스키마가 설정을 안하는 것이 디폴트다. 하지만 스키마를 고정하고 싶은 경우 두 가지 방법을 사용할 수 있다.
- JSON schema
io.confluent.connect.json.JsonSchemaConverter를 쓴다 (with 스키마 레지스트리)"value.converter": "io.confluent.connect.json.JsonSchemaConverter", "value.converter.schema.registry.url": "http://schema-registry:8081", - 비효율적이지만 매번 메시지에 스키마를 담아서 전송/저장한다.
value.converter=org.apache.kafka.connect.json.JsonConverter
value.converter.schemas.enable=true
2번 방식을 사용하면 메세지가 다음과 같이 schema 부분과, payload 부분이 함께 저장된다.
{
  "schema": {
    "type": "struct",
    "fields": [
      {
        "type": "int64",
        "optional": false,
        "field": "registertime"
      },
      {
        "type": "string",
        "optional": false,
        "field": "userid"
      },
      {
        "type": "string",
        "optional": false,
        "field": "regionid"
      },
      {
        "type": "string",
        "optional": false,
        "field": "gender"
      }
    ],
    "optional": false,
    "name": "ksql.users"
  },
  "payload": "Hello World"
}
이렇게 하면 메세지 사이즈가 커지기 때문에 비효율적이다. 그래서 스키마가 필요한 경우에는 스키마 레지스트리를 사용하는 것이 효율적이다.
만약 컨버터에 JSON serializer를 사용했고 스키마를 따로 설정하지 않을거라면,
value.converter=org.apache.kafka.connect.json.JsonConverter
value.converter.schemas.enable=false
이렇게 schema를 찾을 필요 없다고 명시해주자. (디폴트가 false인데 왜 해줘야하는거지..?)
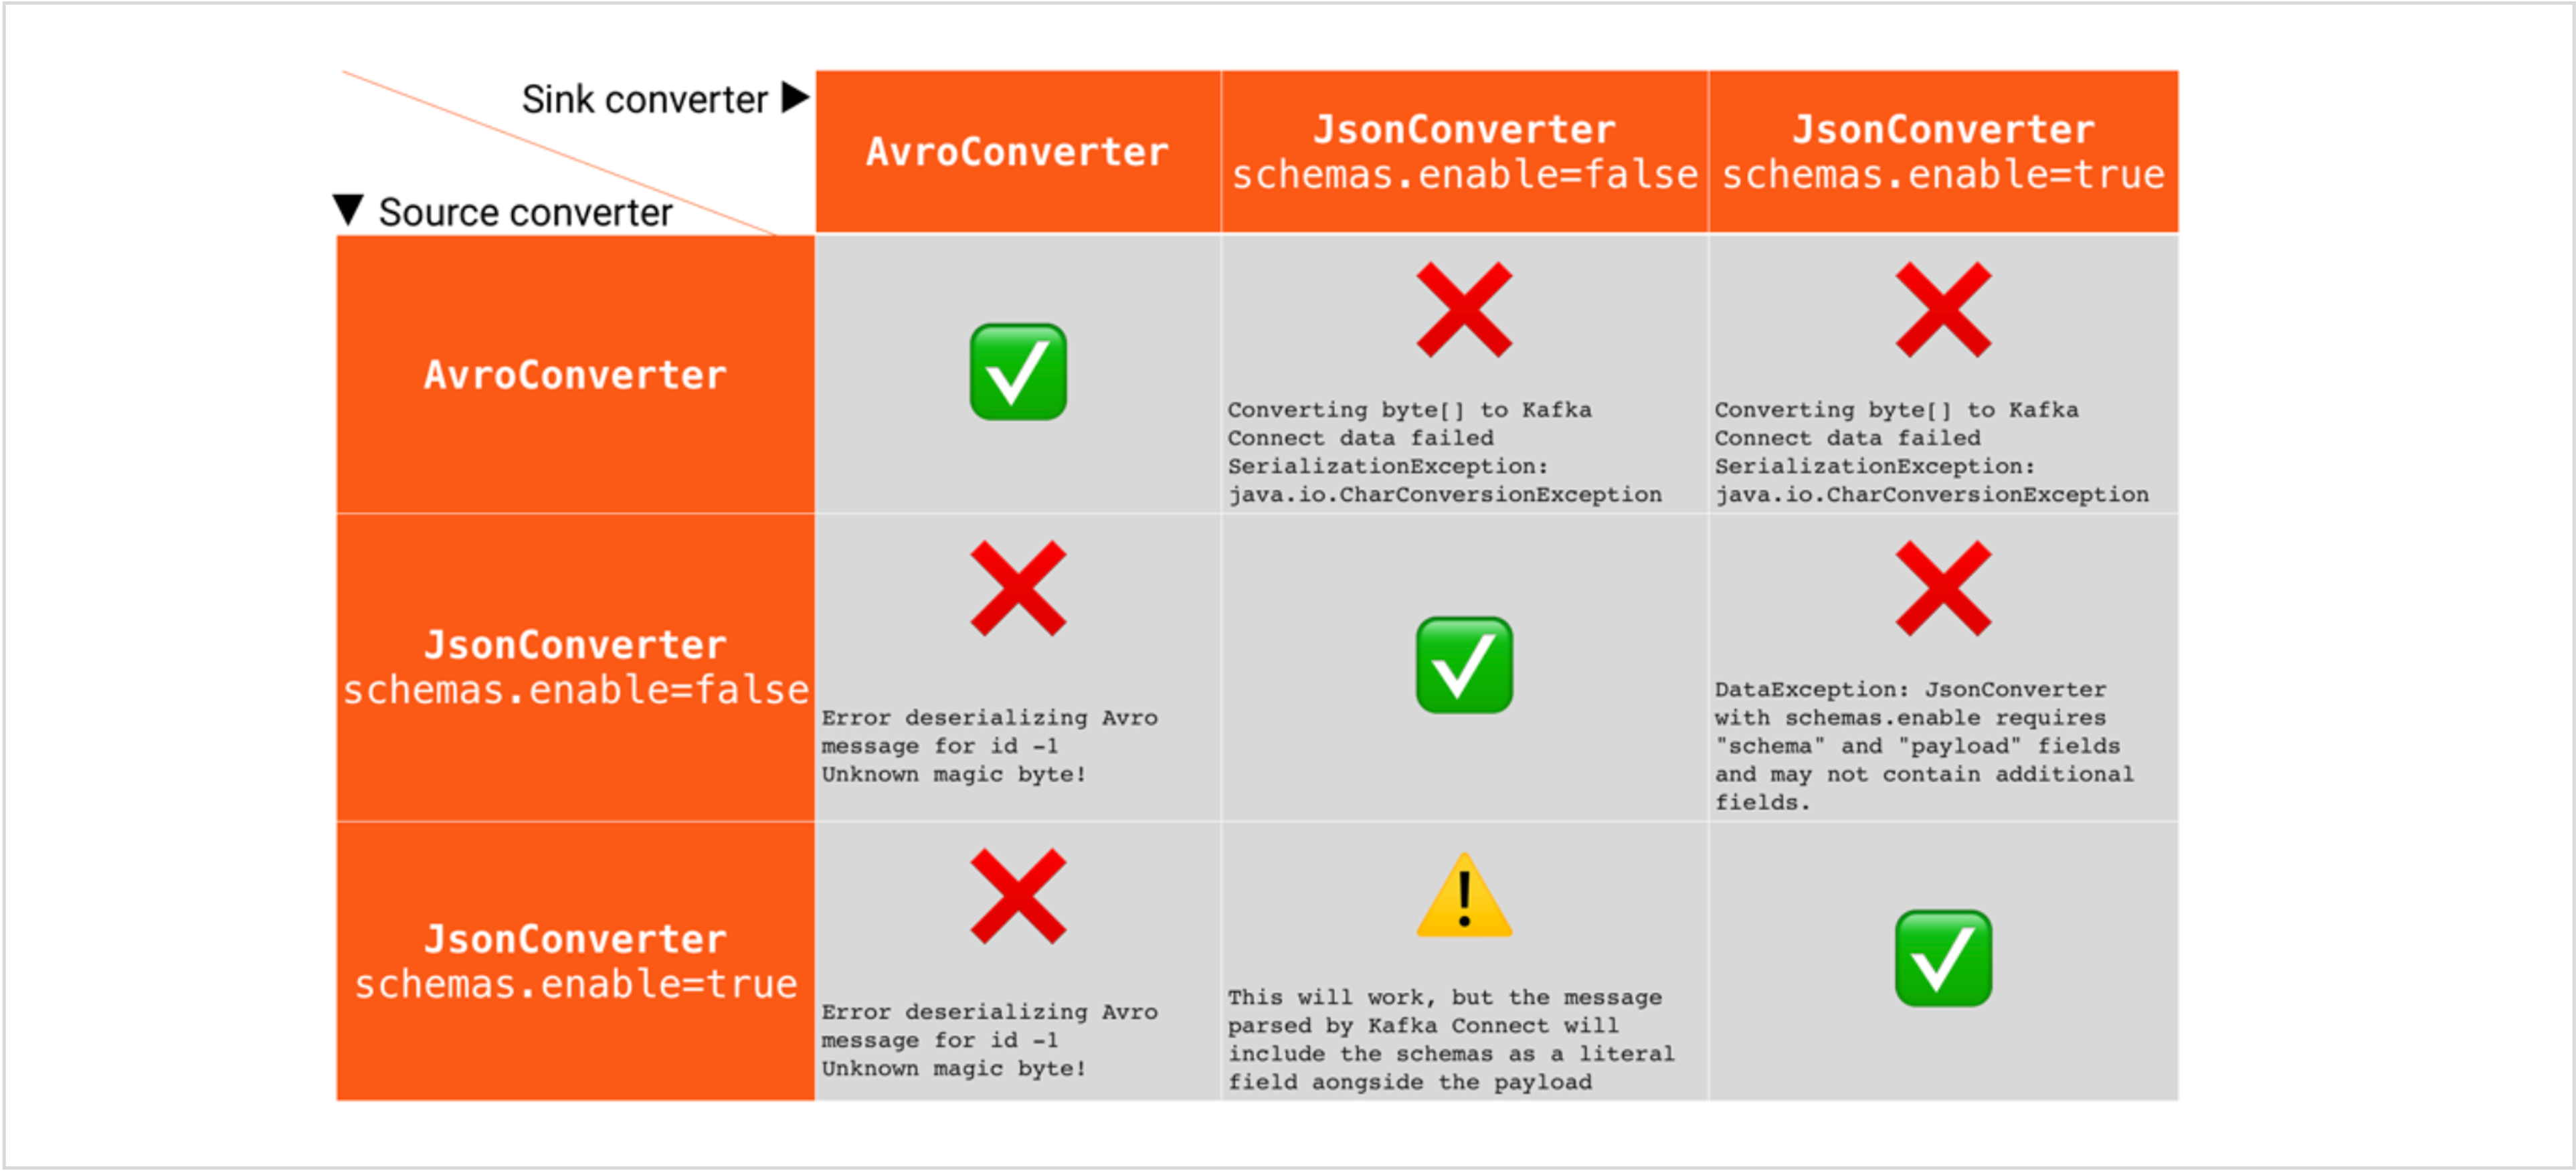
아래 표는 serializer와 deserializer의 싱크를 어떻게 맞춰야 에러가 안나는지 알려준다. 기본적으로 serializer는 메세지나 상황에 맞게 원하는 것을 선택하고, deserializer는 serializer와 같은 포맷을 사용하도록 하면 된다.
성능 향상을 위한 파티션 수
To guarantee the order of reading messages from a partition, Kafka restricts to having only one consumer (from a consumer group) per partition. So, if a partition gets messages a,f and k, the consumer will also read them in the order a,f and k. This is an important thing to make a note of as the order of message consumption is not guaranteed at a topic level when you have multiple partitions.
파티션 내에서는 메세지의 순서가 지켜진다. 그래서 토픽을 이루는 파티션이 1개라면 메세지의 순서를 걱정할 필요가 없다. 하지만 파티션의 개수를 2개 이상으로 하면 메세지의 순서가 보장되지 않는다.
병렬 처리를 통해 성능을 높이고자 할 때, 파티션의 개수와 컨슈머의 개수를 늘려준다.
- 파티션의 수 >= 컨슈머 수
- 병렬 정도 = MIN(파티션의 수, 컨슈머 수)
- 파티션의 개수는 늘릴수만 있고 줄일 수는 없음
장애 복구를 위한 복제
복제는 특정 브로커 서버에 장애가 났을 경우를 대비하기 위한 용도다. 만약 브로커가 1대라면 복제는 아무 의미가 없다. 복제는 브로커의 개수만큼 설정하면 된다. 더 크게 더 적게 해도 되지만, 같게 하는 것이 제일 합당한 선택이다.
복제수는 토픽마다 다르게 설정할 수 있다. 복제 수는 늘리는 만큼 성능이 약간 떨어진다. 그래서 토픽의 중요도에 따라 다르게 설정하는 것이 좋다.
복제에 관해 이해하려면 리더/팔로워, 커밋과 같은 것들을 배워야 한다. 컨슈머는 리더 파티션만 가져갈 수 있다. 복제는 리더가 장애가 났을 경우를 대비하기 위한 용도다.
Say for the freblogg topic that we’ve been using so far, we’ve given the replication factor as 2. The resulting distribution of its three partitions will look something like this.
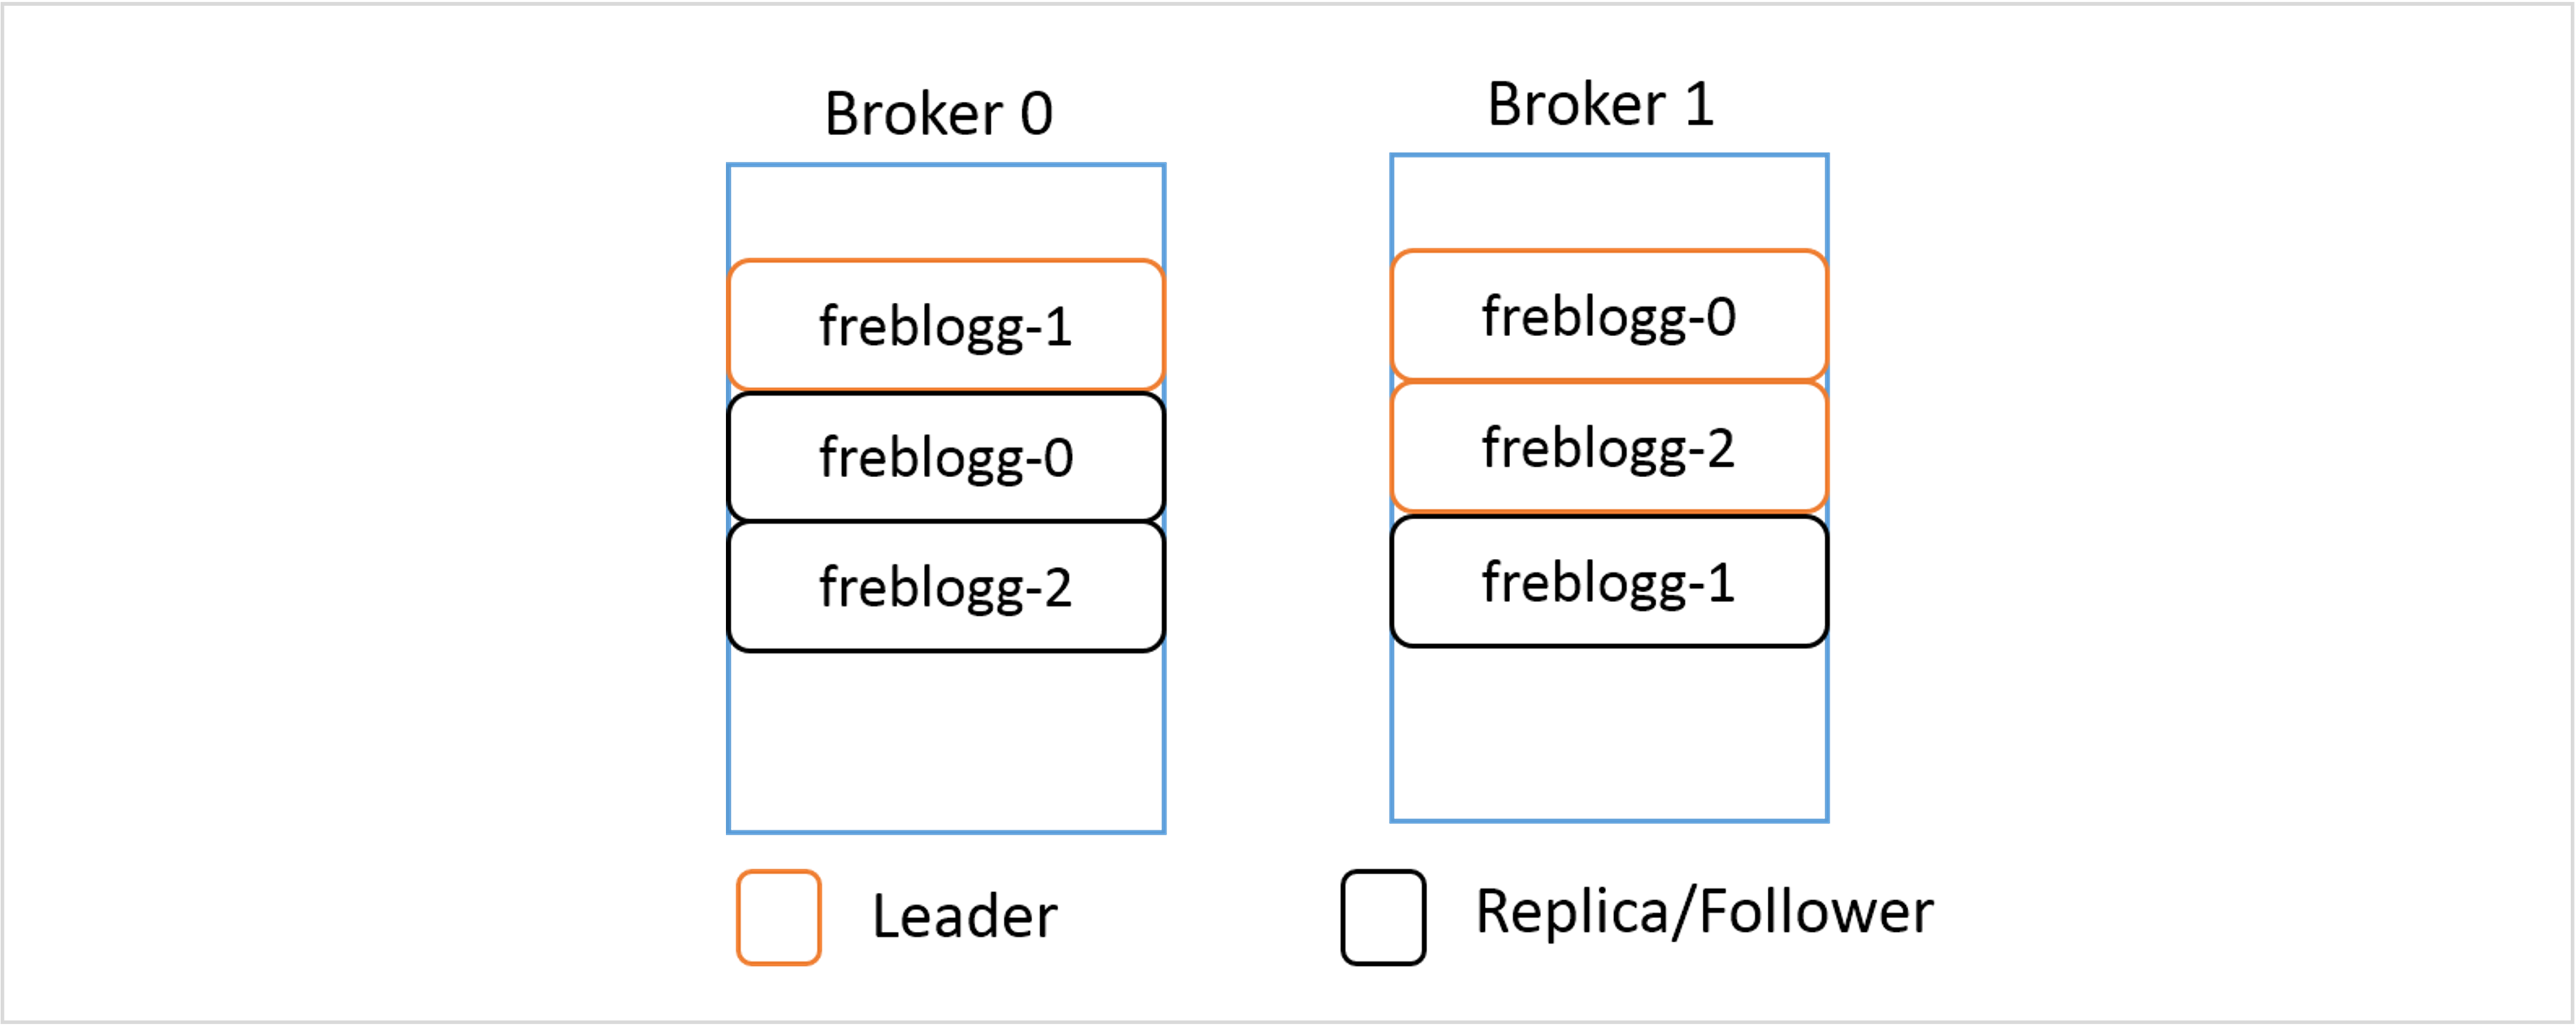
Even when you have a replicated partition on a different broker, Kafka wouldn’t let you read from it because in each replicated set of partitions, there is a LEADER and the rest of them are just mere FOLLOWERS serving as backup. The followers keep on syncing the data from the leader partition periodically, waiting for their chance to shine. When the leader goes down, one of the in-sync follower partitions is chosen as the new leader and now you can consume data from this partition.
A Leader and a Follower of a single partition are never in a single broker. It should be quite obvious why that is so.
로그 설정을 통해 효율적으로 보관하기(Log Retention)
Apache Kafka is a commit-log system. The records are appended at the end of each Partition, and each Partition is also split into segments. Segments help delete older records through Compaction, improve performance, and much more.
(아파치 카프카는 커밋-로그 시스템이다. 레코드는 파티션의 끝에 append되고, 파티션의 세그먼트 파일로 분리되어 저장된다. 세그먼트 파일을 통해 카프카는 오래된 레코드를 관리할 수 있다.)
Kafka allows us to optimize the log-related configurations, we can control the rolling of segments, log retention, etc. These configurations determine how long the record will be stored and we’ll see how it impacts the broker’s performance, especially when the cleanup policy is set to Delete.
(카프카에는 로그 저장/삭제와 관련된 설정을 통해 로그를 얼마나 오랫동안 저장하고 있을지 설정할 수 있다)
For better performance and maintainability, multiple segments get created, and rather than reading from one huge Partition, Consumers can now read faster from a smaller segment file. A directory with the partition name gets created and maintains all the segments for that partition as various files.

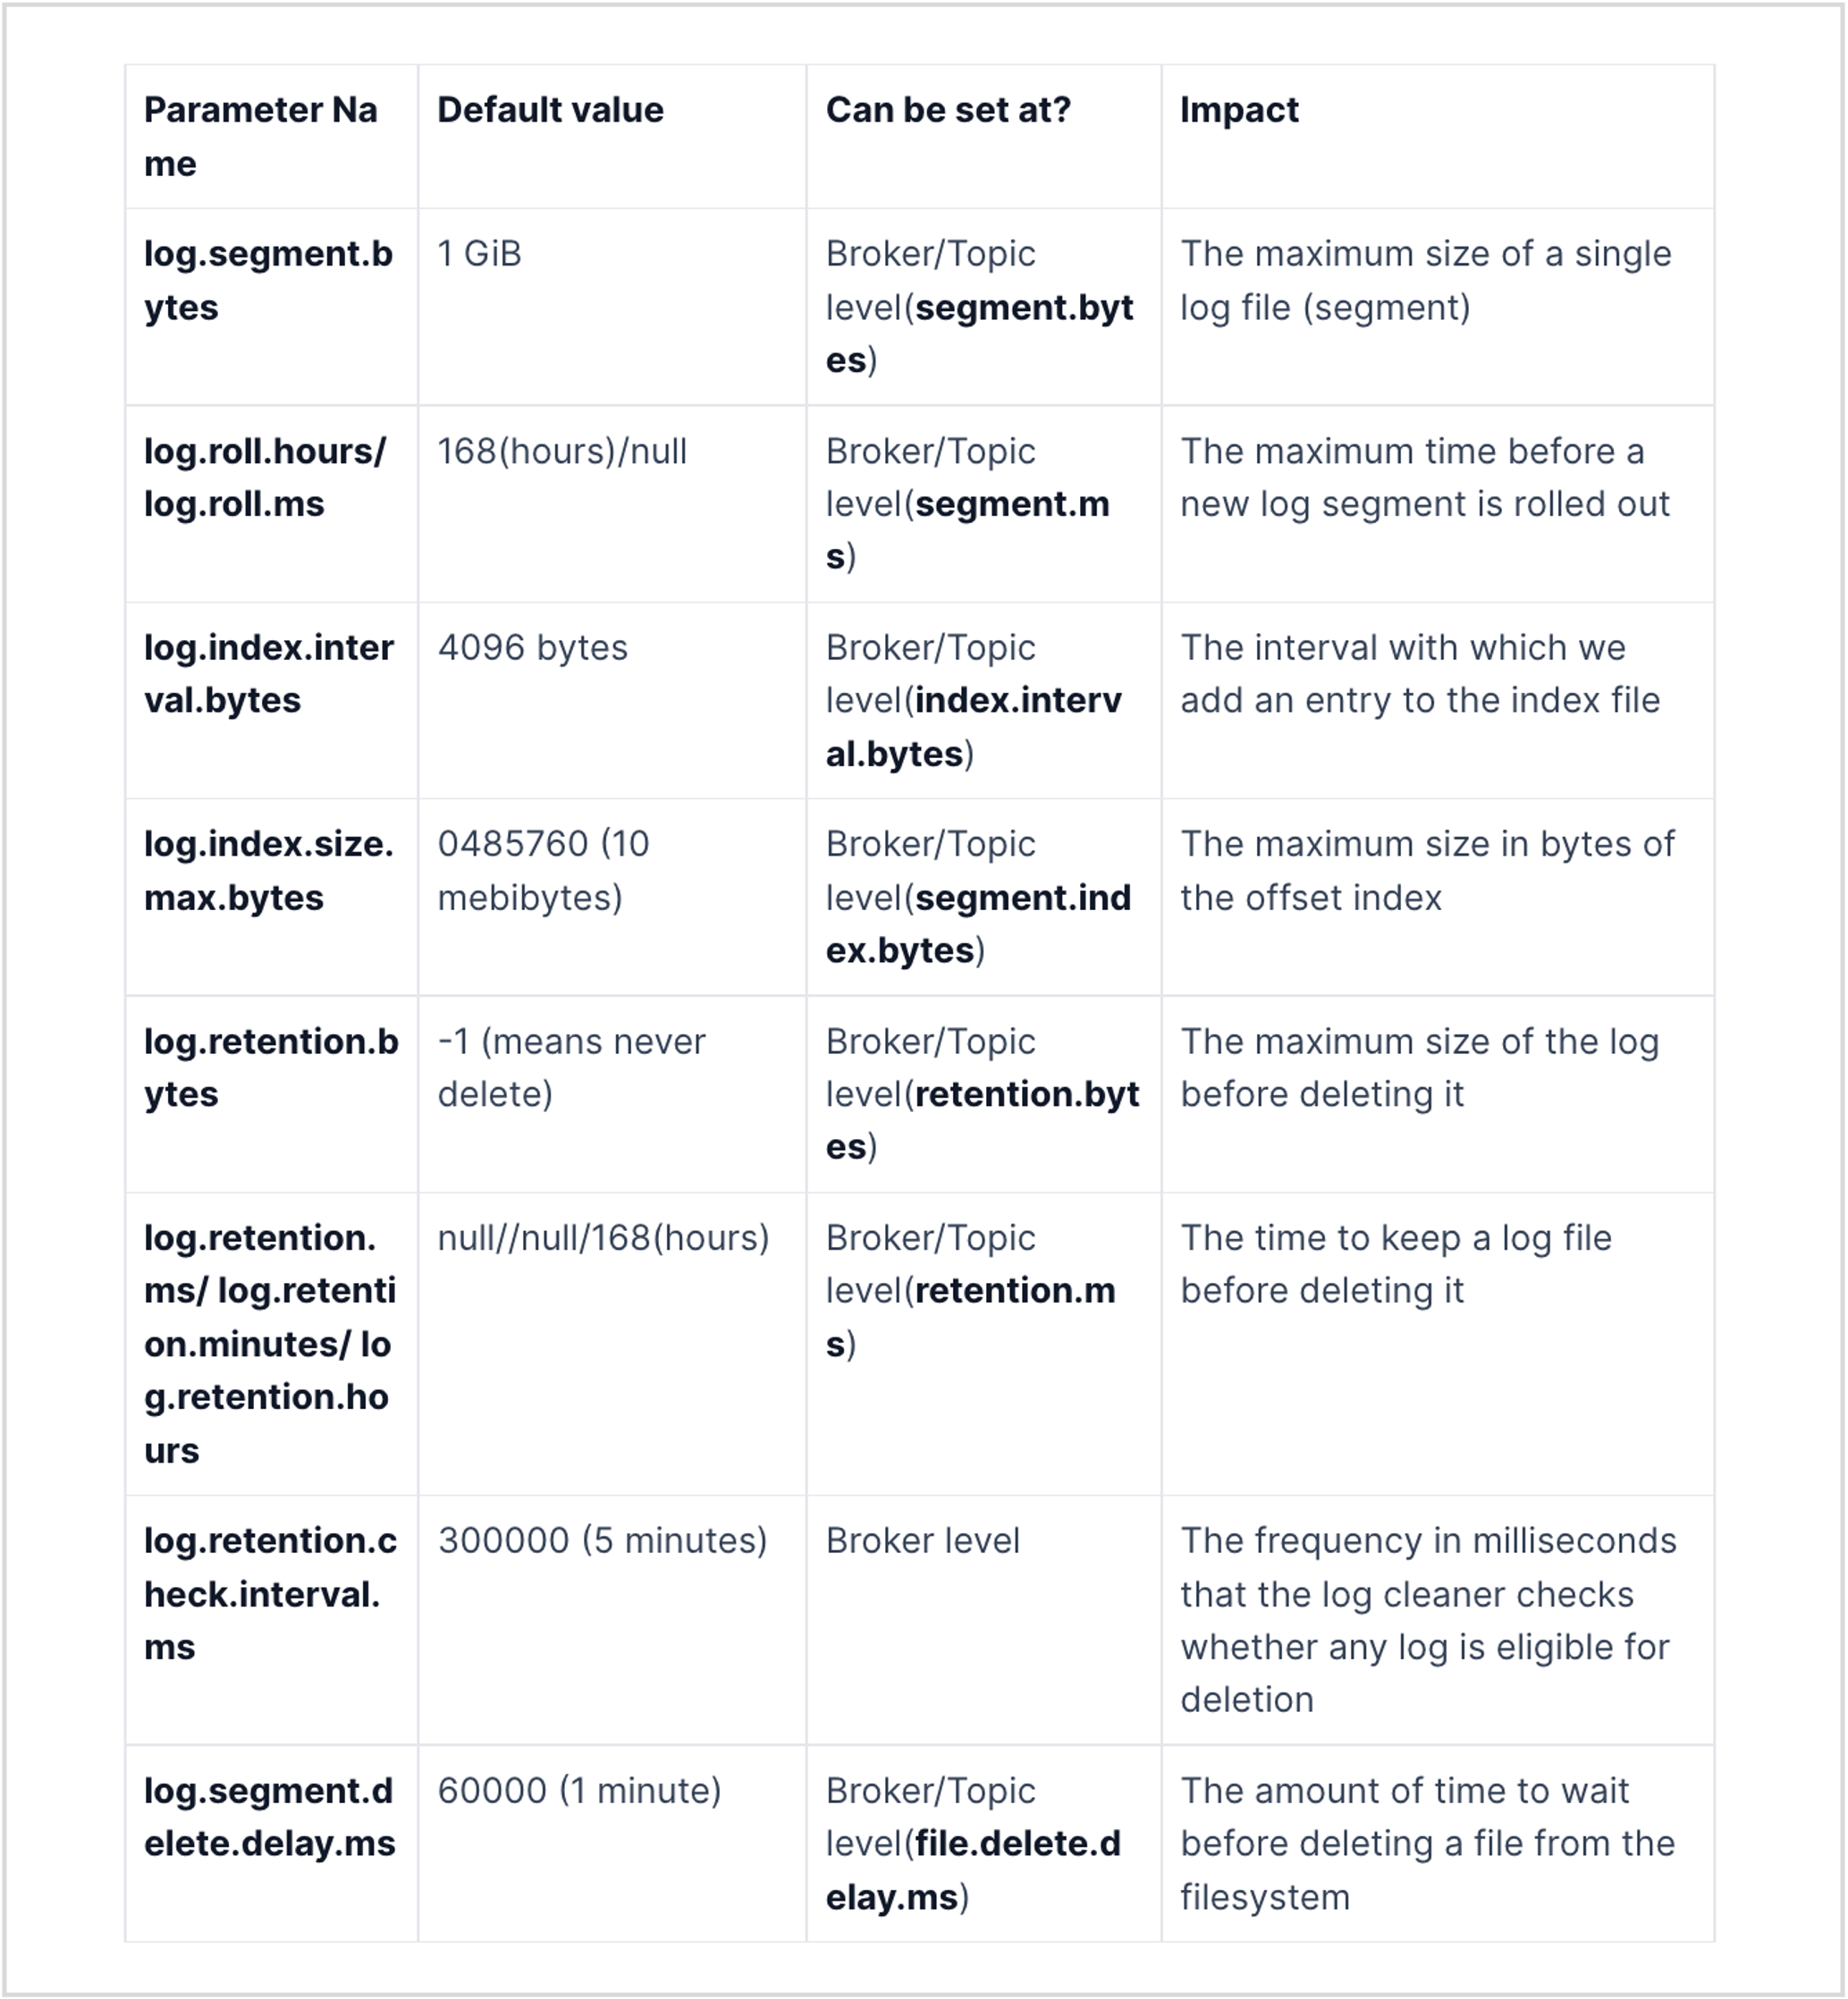
The active segment is the only file available for reading and writing while consumers can use other log segments (non-active) to read data. When the active segment becomes full (configured by log.segment.bytes, default 1 GB) or the configured time (log.roll.hours or log.roll.ms, default 7 days) passes, the segment gets rolled. This means that the active segment gets closed and re-opens with read-only mode and a new segment file (active segment) will be created in read-write mode.
(세그먼트 파일은 보통 읽기만 가능하고, active인 세그먼트 파일에만 쓰는 것도 가능하다. active 세그먼트 파일은 log.segment.bytes 의 크기를 초과하거나, log.roll.hours 시간을 초과하는 경우 활성화가 종료되고, 새로운 active 세그먼트 파일을 생성한다.)
Role of Indexing within the Partition
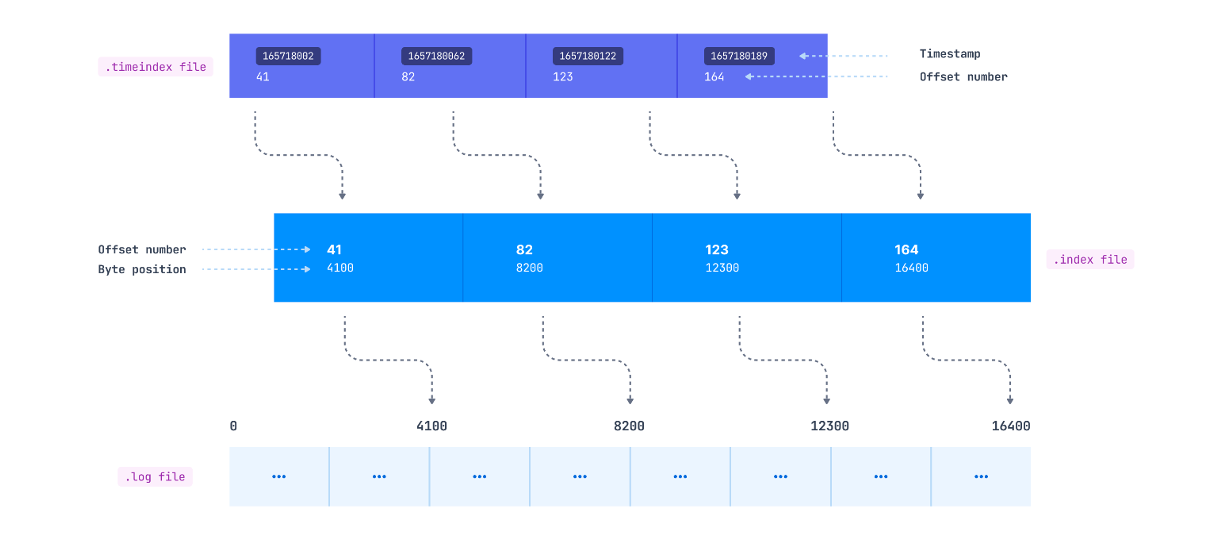
Indexing helps consumers to read data starting from any specific offset or using any time range. As mentioned previously, the .index file contains an index that maps the logical offset to the byte offset of the record within the .log file. You might expect that this mapping is available for each record, but it doesn’t work this way.
How these entries are added inside the index file is defined by the log.index.interval.bytes parameter, which is 4096 bytes by default. This means that after every 4096 bytes added to the .log file, an entry gets added to the .index file. Suppose the producer is sending records of 100 bytes each to a Kafka topic. In this case, a new index entry will be added to the .index file after every 41 records (41*100 = 4100 bytes) appended to the log file.
(log.index.interval.bytes 크기만큼의 레코드가 보내진 후 다음 레코드의 메모리 주소가 인덱싱 된다)
(컨슈머는 먼저 .index 파일의 인덱싱 정보를 통해 읽어들일 메모리의 처음 위치를 선택한다)

If a consumer wants to read starting at a specific offset, a search for the record is made as follows:
- Search for the
.indexfile based on its name. For e.g. If the offset is 1191, the index file will be searched whose name has a value less than 1191. The naming convention for the index file is the same as that of the log file - Search for an entry in the
.indexfile where the requested offset falls. - Use the mapped byte offset to access the
.logfile and start consuming the records from that byte offset.
As we mentioned, consumers may also want to read the records from a specific timestamp. This is where the .timeindex file comes into the picture. It maintains a timestamp and offset mapping (which maps to the corresponding entry in the .index file), which maps to the actual byte offset in the .log file. (특정 타임스탬프로 레코드 읽는 방법: .timeindex -> .index -> .log)
Rolling segments
As discussed in the above sections, the active segment gets rolled once any of these conditions are met-
- Maximum segment size - configured by
log.segment.bytes, defaults to 1 Gb - Rolling segment time - configured by
log.roll.msorlog.roll.hours, defaults to 7 days - Index/timeindex is full - The index and timeindex share the same maximum size, which is defined by the
log.index.size.max.bytes, defaults to 10 MB
(보통 1번 크기를 늘리면, 3번 크기도 늘려야 한다)
Impact of increasing/decreasing the segment size
Generally you don’t want to increase/decrease the log.segment.bytes and keep it as default. But let’s discuss the impact of changing this value so that you can make an informed decision if there’s a need.
Log retention - The records may persist longer than the retention time
Kafka, with its feature of retaining the log for a longer duration rather than deleting it like traditional messaging queues once consumed, provides many added advantages. Multiple consumers can read the same data, apart from reading the data it can also be sent to data warehouses for further analytics.
How long is the data retained in Kafka? This is configurable using the maximum number of bytes to retain by using the log.retention.bytes parameter. If you want to set a retention period, you can use the log.retention.ms, log.retention.minutes, or log.retention.hours (7 days by default) parameters.
The following things may impact when the records get deleted-
- If the producer is slow and the maximum size of 16 Kb is not reached within 10 minutes, older records won’t be deleted. In this case, the log retention would be higher than 10 mins.
- If the active segment is filled quickly, it will be closed but only get deleted once the last inserted record persists for 10 mins. So in this case as well, the latest inserted record would be persisted for more than 10 mins. - Suppose the segment is getting filled in 7 mins and getting closed, the last inserted record will stay for 10 mins so the actual retention time for the first record inserted into the segment would be 17 mins.
- The log can be persisted for an even longer duration than the last added record in the segment. How? Because the thread which gets executed and checks which log segments need to be deleted runs every 5 mins. This is configurable using log.retention.check.interval.ms configurations. - Depending on the last added record to the segment, this cleanup thread can miss the 10 min retention deadline. So in our example above instead of persisting the segment for 17 mins, it could be persisted for 22 mins.
- Do you think that this would be the maximum time the record is persisted in Kafka? No, the cleaner thread checks and just marks the segment to be deleted. The log.segment.delete.delay.ms broker parameter defines when the file will actually be removed from the file system when it’s marked as “deleted” (default, 1 min) - Going back to our example the log is still available even after 23 mins, which is way longer than the retention time of 10 mins.
So The usual retention limits are set by using log.retention.ms defines a kind of minimum time the record will be persisted in the file system.
Consumers get records from closed segments but not from deleted ones, even if they are just marked as “deleted” but not actually removed from the file system.
Conclusion
참고
- Data types for Kafka connector
- Kafka Connect Deep Dive – Converters and Serialization Explained
- dol9, Kafka 스키마 관리, Schema Registry
- A Practical Introduction to Kafka Storage Internals
- Here’s what makes Apache Kafka so fast
- stackoverflow: Which directory does apache kafka store the data in broker nodes
- Abhishek Sharma, How kafka stores data
- Rohith Sankepally:g Deep Dive Into Apache Kafka. Storage Internals
- towardsdatascience, Log Compacted Topics in Apache Kafka
- conduktor, Understanding Kafka’s Internal Storage and Log Retention
- What is a commit log and why should you care?


![Kafka Series [Part4]: 카프카의 데이터 저장](/images/kafka_logo.png)
